graph TD;
    A[Choose the Right AWS Region] --> B[Considerations]
    B --> C[Latency]
    B --> D[Price]
    B --> E[Service Availability]
    B --> F[Data Compliance]

    C --> C1{Sensitive to Latency?}
    C1 -->|Yes| C2[Choose a nearby Region]
    C1 -->|No| C3[Evaluate other factors]

    D --> D1{Price Variation Factors}
    D1 -->|Local Economy| D2[Impact on pricing]

    E --> E1{Service Availability Check}
    E1 --> E2[AWS Documentation for Services]

    F --> F1{Compliance Requirements}
    F1 -->|Yes| F2[Select compliant Region]
    F1 -->|No| F3[Proceed with other factors]
I’ve pulled together my notes on AWS Fundamentals — covering Security, Compute, Networking, Databases, and more — based on the AWS Technical Essentials course from Coursera. I’ve also included my ChatGPT interactions, where I explored specific doubts and clarified tricky concepts along the way. This resource should be handy for anyone attempting to revise concepts before an AWS exam
Source: All pictures are from the Coursera Course (unless specified otherwise) and are intended only for learning purposes.
1. Introduction to AWS
1.1 Architectue that was used in the Course
1.2 Course Roadmap

1.3 AWS Global Infrastructure
1.3.1 CHOOSE THE RIGHT AWS REGION
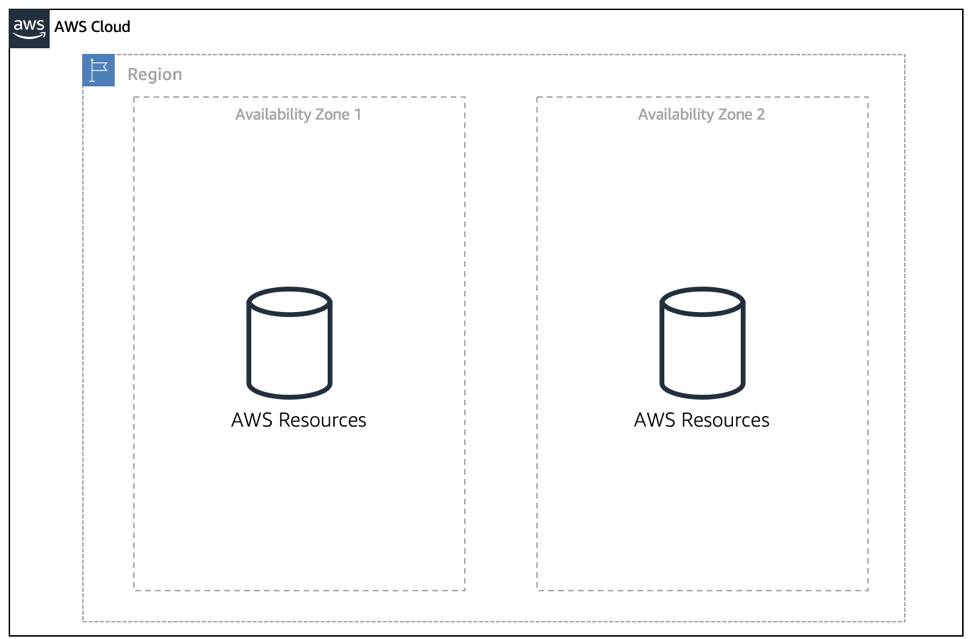
1.3.1 AVAILABILITY ZONES
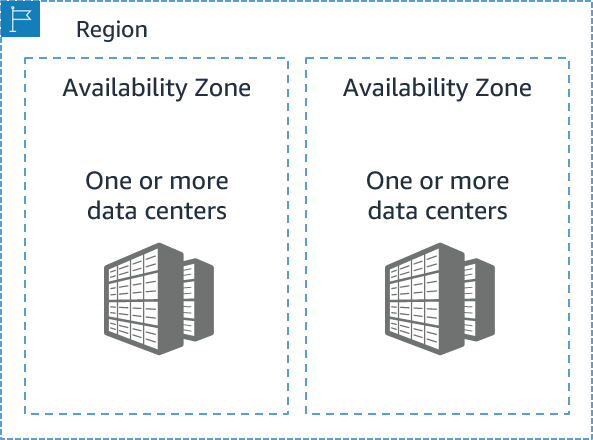
- Each AWS Region contains multiple Availability Zones (AZs).
- An AZ consists of one or more data centers with:
- Redundant power
- Networking
- Connectivity
- Data centers operate in separate, undisclosed facilities.
- AZs are connected with redundant, high-speed, low-latency links.
- Each AZ has a code name, formed by appending a letter to the Region code:
- Example:
us-east-1a→ AZ “a” inus-east-1(Northern Virginia Region) - Example:
sa-east-1b→ AZ “b” insa-east-1(São Paulo Region)
- Example:
- If a resource is in
us-east-1c, it means it resides in AZ “c” of the us-east-1 Region.
1.3.2 SCOPE AWS SERVICES
graph TD;
    A[AWS Services Scope] --> B[Region-Scoped Services]
    A --> C[AZ-Scoped Services]
    D[AWS Handles Durability &<br> Availability]
    A --> E[Global Services]

    B --> D
    D --> B1[[Amazon S3]]
    D --> B2[[Amazon RDS Multi-AZ]]
    D --> B3[[Amazon DynamoDB]]

    C --> D3[Customer responsible<br>for durability &<br>availability]
    D3 --> C1[[Amazon EC2]]
    D3 --> C2[[Amazon RDS Single-AZ]]
    D3 --> C3[[Amazon EBS]]

    E --> D2[AWS Handles Durability &<br> Availability]
    D2 --> E1[[AWS IAM]]
    D2 --> E2[[AWS Route 53]]
    D2 --> E3[[AWS CloudFront]]
1.3.3 MAINTAIN RESILIENCY
- To ensure application availability, design for high availability and resiliency.
- Best practice: use Region-scoped managed services (they have availability and resiliency built-in).
- When Region-scoped services are not possible:
- Replicate workloads across multiple AZs.
- Use at least two AZs.
- Replicate workloads across multiple AZs.
- If one AZ fails, the application can still run in the second AZ, ensuring traffic is handled.
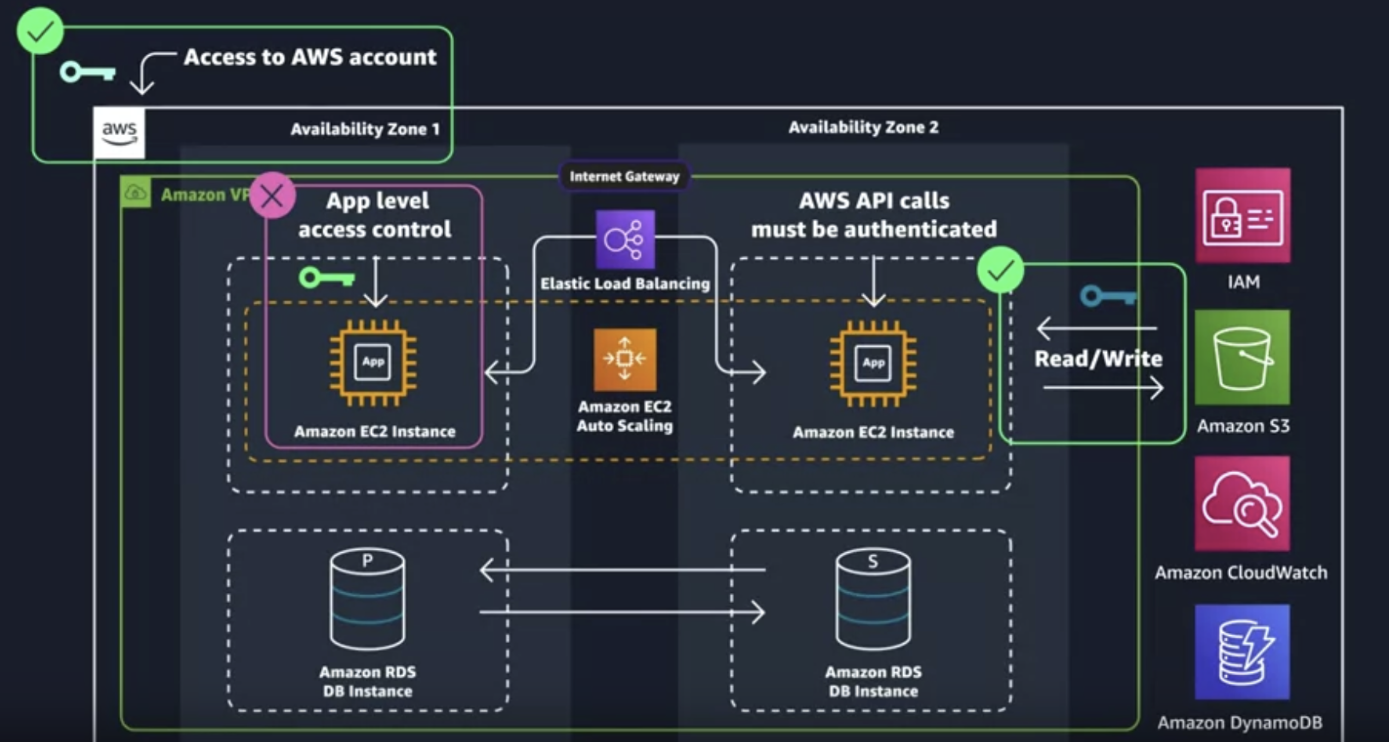
1.3.4 Security and the AWS Shared Responsibility Model
security of the cloud (aws responsbility) versus security in the cloud (customer responsbility).

WHAT IS AWS RESPONSIBLE FOR?
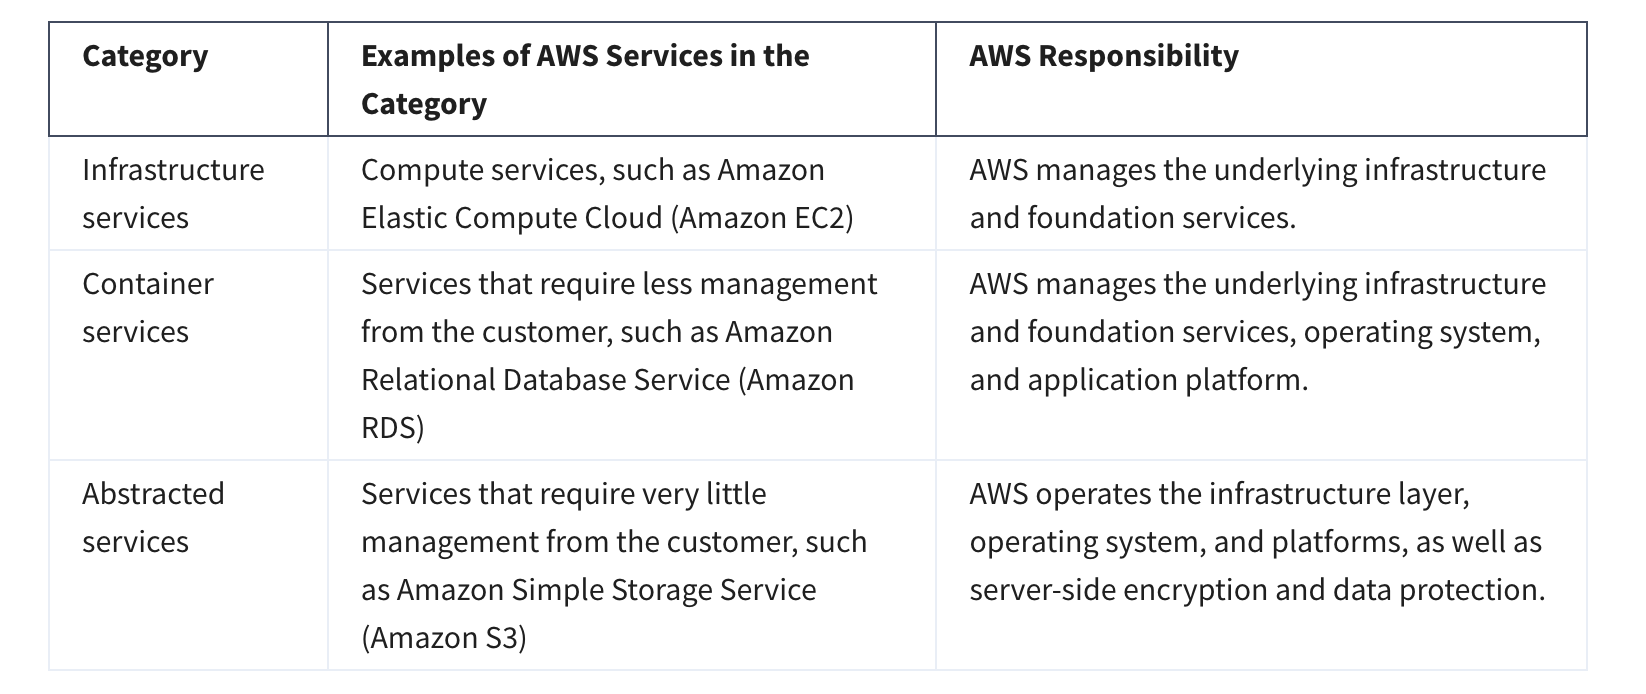
- Container services in AWS ≠ Docker container services.
- AWS abstracts and manages application containers behind the scenes.
- Responsibility for managing the container platform is shifted from customers to AWS.
WHAT IS THE CUSTOMER RESPONSIBLE FOR?

1.4 Protect the AWS Root User
What’s the Big Deal About Auth?
- When configuring account access, two key terms appear often: authentication and authorization.
- Though basic, they are essential for proper AWS access management.
Understand Authentication
- When creating an AWS account, you log in with email + password to verify your identity.
- If credentials are correct, the system grants access → this is authentication.
- Authentication ensures the user is who they claim to be.
- Common methods:
- Username + password
- Token-based authentication
- Biometric data (e.g., fingerprint)
- Username + password
- Authentication answers the question: “Are you who you say you are?”
What Is the AWS Root User?
- When you create an AWS account, you start with a single sign-in identity.
- This identity has full access to all AWS services and resources.
- It is called the AWS root user.
- You access the root user by signing in with the email + password used to create the account.
Understand the AWS Root User Credentials
- The AWS root user has two sets of credentials:
- Email + password → used to sign in to the AWS Management Console.
- Access keys → used for programmatic access via AWS CLI or AWS API.
- Email + password → used to sign in to the AWS Management Console.
- Access keys consist of two parts:
- Access key ID (e.g.,
A2lAl5EXAMPLE)
- Secret access key (e.g.,
wJalrFE/KbEKxE)
- Access key ID (e.g.,
- Both parts are required, similar to a username + password combination.
- Access keys should be treated with the same level of security as your email and password.
Follow Best Practices When Working with the AWS Root User
- The root user has complete access to:
- All AWS services and resources
- Billing information
- Personal account information
- All AWS services and resources
- Because of this, do not use the root user for everyday tasks.
- Instead, securely lock away the root user credentials.
- To ensure root user safety:
- Enable multi-factor authentication (MFA)
- Use the root user only for account setup and rare administrative tasks
- Enable multi-factor authentication (MFA)
- Choose a strong password for the root user.
- Never share your root user password or access keys with anyone.
- Disable or delete the access keys associated with the root user.
- Do not use the root user for administrative tasks or everyday tasks.
When is it OK to use the AWS root user?
There are some tasks where it makes sense to use the AWS root user. Check out the links at the end of this section to read about them. Link: aws_tasks-that-require-root
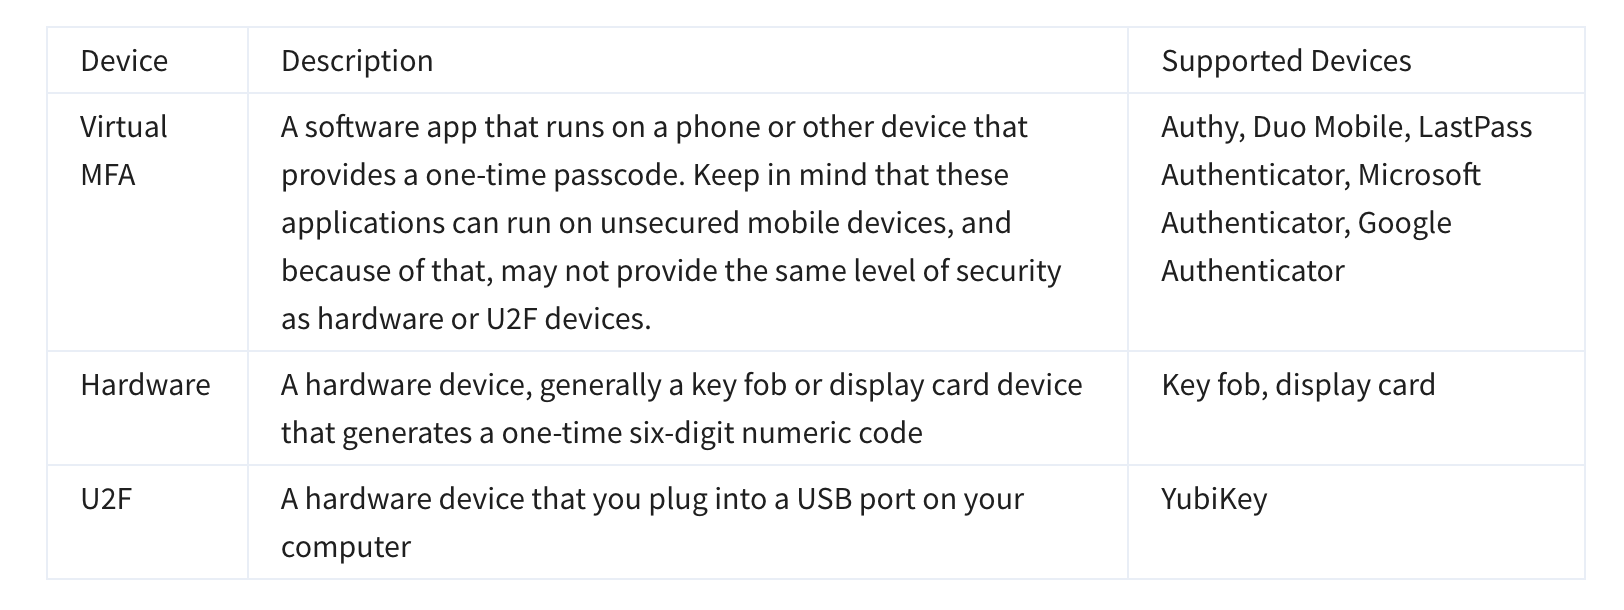
The Case for Multi-Factor Authentication
- When you first log in to AWS, you use single-factor authentication (SFA) → usually username + password.
- SFA is vulnerable (passwords can be guessed, cracked, or stolen).
- Multi-factor authentication (MFA) adds an extra layer of security by requiring two or more methods from different categories:
- Something you know → password, PIN
- Something you have → one-time code from device/app
- Something you are → biometric (fingerprint, face scan)
- Something you know → password, PIN
- Even if a password is compromised, MFA makes it highly unlikely an attacker can bypass the second factor.
- Best practice: Always enable MFA on the AWS root user.
2. Security
2.1 Introduction to AWS Identity and Access Management
WHAT IS IAM?
- IAM (Identity and Access Management) is a web service for managing access to AWS accounts and resources.
- Provides centralized control of:
- Authentication → who/what can enter the account
- Authorization → who/what can use specific resources
- Authentication → who/what can enter the account
- Benefits of IAM:
- Share access without exposing root credentials (email/password or access keys)
- Grant granular permissions so users/services only access what they need
- Example: give a user read-only access to specific actions/resources in one service
- Share access without exposing root credentials (email/password or access keys)
GET TO KNOW THE IAM FEATURES
- IAM is global → not tied to a specific Region (accessible from any Region).
- Integrated by default with many AWS services.
- Supports password policies (complexity rules, rotation).
- Supports MFA for stronger security.
- Supports identity federation → users can access AWS with existing credentials (e.g., corporate network, identity provider).
- Free to use → no additional charge for IAM.
WHAT IS AN IAM USER?
- An IAM user represents a person or service that interacts with AWS.
- Defined within your AWS account → all activity is billed to your account.
- IAM users can sign in to access AWS resources.
- You can create multiple users as needed (e.g., team members on a project).
- Each user should have their own login credentials → prevents credential sharing.
IAM USER CREDENTIALS
- An IAM user has a name and a set of credentials.
- When creating a user, you can provide:
- Console access → username + password
- Programmatic access → access keys for AWS CLI or AWS API
- Console access → username + password
- IAM user credentials are permanent until rotated by admins.
- Permissions can be granted directly to users, but:
- Works only for a few users
- Becomes hard to manage at scale (e.g., thousands of users)
- Works only for a few users
- Best practice: Group IAM users and assign permissions at the group level.
WHAT IS AN IAM GROUP?
- An IAM group is a collection of IAM users.
- All users in a group inherit the group’s permissions → easier, scalable permission management.
- Best practice: Organize groups by job function (e.g., developers, security, admins).
Examples:
- New developer joins → add to developer group (no need to assign permissions individually).
- User changes role → move from one group to another (permissions updated automatically).
Key features of groups:
- A group can have many users.
- A user can belong to multiple groups.
- Groups cannot belong to other groups.
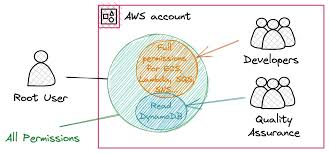
⚡ Contrast with root user:
- Root user = full access to all resources by default.
- New IAM users/groups/roles = no permissions by default until explicitly granted.
- Permissions in IAM are granted through IAM policies.
WHAT IS AN IAM POLICY?
- IAM policies manage access and permissions to AWS services/resources.
- Policies can be attached to users, groups, or roles.
- When a request is made, AWS evaluates:
- Policies on the user/role
- Policies on any groups the user belongs to
- Policies on the user/role
- Example: A developer in the developers group → AWS checks both the group policies and the user’s policies to decide allow/deny.
IAM POLICY EXAMPLES
Most policies are stored in AWS as JSON documents with several policy elements. Take a look at the following example of what providing admin access through an IAM identity-based policy looks like.
{

"Version": "2012-10-17",
     "Statement": [{
          "Effect": "Allow",
          "Action": "*",
          "Resource": "*"
     }]
}
An IAM policy has four key JSON elements:
- Version → defines the policy language version.
- Always use
"Version": "2012-10-17"for full feature support.
- Always use
- Effect → specifies whether to Allow or Deny access.
- Action → describes the allowed/denied actions.
"*"= wildcard → all actions.
- Resource → defines which resources are affected.
"*"= all resources.
- Version → defines the policy language version.
Example: Policy with
"Action": "*"and"Resource": "*"→ grants administrator access (all actions on all resources).
{"Version": "2012-10-17",
     "Statement": [{
          "Effect": "Allow",
          "Action": [
               "iam: ChangePassword",
               "iam: GetUser"
               ],
          "Resource": "arn:aws:iam::123456789012:user/${aws:username}"
     }]
}- More granular example:
- Allows a user to:
iam:ChangePassword(change their own password)
iam:GetUser(get info about their own user)
- Uses variable substitution
${aws:username}→ limits permissions to the specific user only.
- Allows a user to:
UNDERSTAND POLICY STRUCTURE
When creating a policy, it is required to have each of the following elements inside a policy statement.

2.2 Role Based Access in AWS
- Lock down the root user
- Don’t share root credentials.
- Delete root access keys if possible.
- Enable MFA on the root account.
- Don’t share root credentials.
- Follow the principle of least privilege
- Grant only the permissions required to perform a specific job.
- Start with minimum access, then add permissions as needed.
- Grant only the permissions required to perform a specific job.
- Use IAM appropriately
- IAM secures access within a single AWS account (users, groups, roles).
- Not for website sign-in/sign-up or OS/network security.
- IAM secures access within a single AWS account (users, groups, roles).
- Use IAM roles when possible
- Roles provide temporary credentials (15 min – 36 hrs).
- Easier to manage than long-term IAM user credentials.
- Reduces risk from leaked/stale access keys.
- Roles provide temporary credentials (15 min – 36 hrs).
- Consider using an Identity Provider (IdP)
- Centralizes identity management across multiple AWS accounts.
- Use IAM roles to grant permissions to federated identities.
- Example: manage an employee once in the IdP instead of duplicating IAM users across accounts.
- Centralizes identity management across multiple AWS accounts.
- Consider AWS IAM Identity Center
- Provides single sign-on (SSO) for AWS accounts and apps.
- Lets you create users, groups, and assign permissions centrally.
- Can sync with third-party IdPs, reducing duplication.
- Separates identity management from AWS for added security.
- Provides single sign-on (SSO) for AWS accounts and apps.
2.3 Summarizing the sections 2.1 and 2.2:
graph TD;
    A[Security in AWS] --> B[AWS Identity<br> and Access Management<br>IAM]
    B --> C[What is IAM?]
    B --> D[Features of IAM]
    B --> E[IAM User]
    B --> F[IAM Group]
    B --> G[IAM Policy]
    B --> H[Role-Based Accesses<br> for AWS Services]
    C --> C1[Manage access <br>to AWS resources]
    C --> C2[Centralized authentication<br> and authorization]
graph TD;
    A[Security in AWS] --> B[AWS Identity<br> and Access Management<br>IAM]
    B --> C[What is IAM?]
    B --> D[Features of IAM]
    B --> E[IAM User]
    B --> F[IAM Group]
    B --> G[IAM Policy]
    B --> H[Role-Based Accesses<br> for AWS Services]
    D --> D1[Global service]
    D --> D2[Integrated with AWS services]
    D --> D3[Password policies]
    D --> D4[MFA support]
    D --> D5[Identity federation]
graph TD;
    A[Security in AWS] --> B[AWS Identity<br> and Access Management<br>IAM]
    B --> D[Features of IAM]
    B --> E[IAM User]
    B --> F[IAM Group]
    B --> G[IAM Policy]
    B --> H[Role-Based Accesses<br> for AWS Services]
    E --> E1[Represents a <br>person]
    E --> E2[User credentials -<br> Console and<br> programmatic access]
graph TD;
    A[Security in AWS] --> B[AWS Identity<br> and Access Management<br>IAM]
    B --> D[Features of IAM]
    B --> E[IAM User]
    B --> F[IAM Group]
    B --> G[IAM Policy]
    B --> F[IAM Group]
    B --> H[Role-Based Accesses<br> for AWS Services]
    F --> F1[Collection of <br>users inheriting permissions]
graph TD;
    A[Security in AWS] --> B[AWS Identity<br> and Access Management<br>IAM]
    B --> D[Features of IAM]
    B --> E[IAM User]
    B --> F[IAM Group]
    B --> G[IAM Policy]
    B --> F[IAM Group]
    B --> H[Role-Based Accesses<br> for AWS Services]
    G --> G1[JSON documents for access management]
graph TD;
    A[Security in AWS] --> B[AWS Identity<br> and Access Management<br>IAM]
    B --> D[Features of IAM]
    B --> E[IAM User]
    B --> F[IAM Group]
    B --> G[IAM Policy]
    B --> F[IAM Group]
    B --> H[Role-Based Accesses<br> for AWS Services]
    A --> H[Role-Based Access in AWS]
    H --> H1[Lock down the AWS root user]
    H --> H2[Follow the principle of least privilege]
    H --> H3[Use IAM appropriately]
    H --> H4[Use IAM roles when possible]
graph TD;
    A[Another Security Service <br>in AWS]
    A --> I[Identity Providers<br> and<br> AWS IAM Identity Center]
    I --> I1[External <br> Identity Provider IdP]
    I --> I2[AWS IdP -<br>IAM Identity Center advantages]
Different types of AWS IAM Users
- Even a CICD System can be an IAM User (with specific permissions)
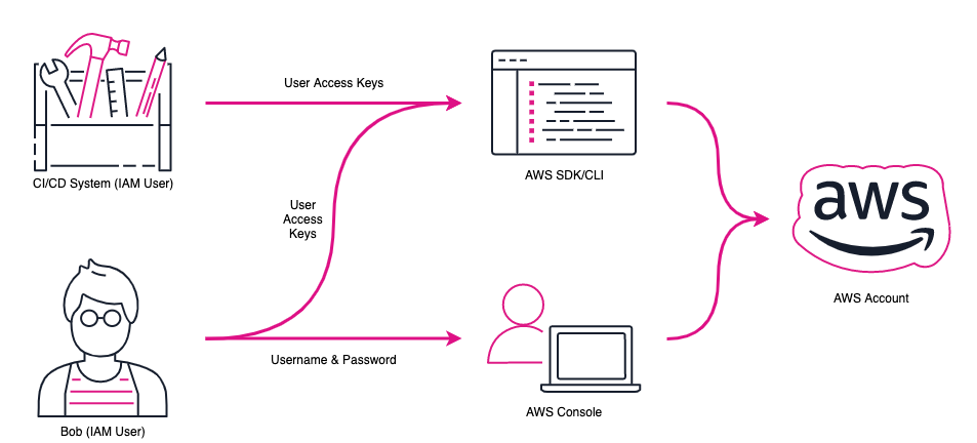 Source: AWS Blg
The concept of Groups and Roles
- One user could be in multiple groups
2.4 Week 1’s Quiz:
A GitHub Source for Week 1 Quiz
3. Compute as a Service
3.1 Introduction to Compute Options in AWS
Understanding Servers
The foundation for hosting any application begins with a server. In a client-server model, a client (a person or a system) sends a request, and the server processes that request and returns a response.
Servers power applications by providing the essential resources—CPU, memory, and networking capacity—needed to process user requests and deliver responses.
In most cases, servers handle Hypertext Transfer Protocol (HTTP) requests and return responses to clients. However, other API-based communication models also follow the same principle.
For context, common HTTP servers include:
- Windows-based options: Internet Information Services (IIS)
- Linux-based options: Apache HTTP Server, Nginx, Apache Tomcat
When running an HTTP server in AWS, you must choose a compute service that provides the required processing power. These compute options can be explored directly from the AWS Management Console, under the list of available AWS Compute Services.

Choose the Right Compute Option
- AWS provides three main compute options:
- Virtual Machines
- Container Services
- Serverless
- Virtual Machines
- Virtual Machines (VMs):
- Easiest option for those with prior infrastructure/server experience.
- Emulates a physical server where you can install applications like an HTTP server.
- Runs on a hypervisor that provisions resources to create and run VMs.
- Easiest option for those with prior infrastructure/server experience.
- Amazon EC2 (Elastic Compute Cloud):
- AWS’s VM service.
- AWS manages the host machines, hypervisor layer, and installs the guest operating system.
- Forms the foundation for understanding other compute services (containers, serverless).
- AWS’s VM service.
- Hypervisor (key concept in virtualization):
- Software/firmware that separates physical hardware from operating systems and applications.
- Allows multiple OS environments to run on a single machine with dedicated CPU, memory, and storage.
- Provides flexibility, scalability, and isolation.
- Software/firmware that separates physical hardware from operating systems and applications.
3.2 Introduction to Amazon Elastic Compute Cloud (AWS EC2)
- Amazon EC2:
- Web service that provides secure, resizable compute capacity in the cloud.
- Lets you provision virtual servers called EC2 instances.
- Not limited to just web servers—can run various workloads.
- Instances can be created and managed via:
- AWS Management Console
- AWS CLI
- AWS SDKs
- Automation/orchestration tools
- AWS Management Console
- Web service that provides secure, resizable compute capacity in the cloud.
- To create an EC2 instance, you define:
- Hardware: CPU, memory, storage, network.
- Logical settings: Networking location, firewall rules, authentication, OS.
- Hardware: CPU, memory, storage, network.
- Amazon Machine Image (AMI):
- Preconfigured template for launching an EC2 instance.
- Includes:
- Operating system (Linux, Windows, etc.)
- Storage mappings
- Architecture type (32-bit, 64-bit, ARM)
- Optional additional software
- Operating system (Linux, Windows, etc.)
- Replaces the traditional manual OS installation process.
- Preconfigured template for launching an EC2 instance.
- Relationship between AMI and EC2 instance:
- AMI = recipe (definition/model).
- EC2 instance = cake (live instantiation).
- Comparable to Class (definition) vs. Object (instantiation) in programming.
- At launch:
- AWS allocates a VM on a hypervisor.
- The AMI is copied to the root device volume for booting.
- Result: a server ready for connection, package installation, and application deployment (e.g., web server + app code).
- AWS allocates a VM on a hypervisor.
- AMI = recipe (definition/model).

One advantage of using Amazon Machine Images (AMIs) is that they are reusable.
For example:
- You might choose a Linux-based AMI.
- Configure it with an HTTP server, application packages, and any additional software your application needs.
- You might choose a Linux-based AMI.
Now, suppose you want to create a second EC2 instance with the exact same configurations:
- Option 1 (Not Ideal):
- Go through the entire instance creation and configuration process again.
- This is time-consuming and leaves room for human error.
- Go through the entire instance creation and configuration process again.
- Option 2 (Better):
- Create an AMI from your running instance.
- Use this AMI to launch a new instance.
- Since the configurations are stored in the AMI, the new instance will automatically have all the same settings as the original one.
- Create an AMI from your running instance.
- Option 1 (Not Ideal):

Where Can You Find AMIs?
You can select an AMI from the following categories.
- Quick Start AMIs that are premade by AWS and allow you to get started quickly.
- AWS Marketplace AMIs that provide popular open source and commercial software from third-party vendors.
- My AMIs that are created from your EC2 instances.
- Community AMIs that are provided by the AWS user community.
- Build your own custom image with EC2 Image Builder.
Amazon Linux 2023 user data script:
When using the user data scripts, remember to replace the
          #!/bin/bash -ex
          wget
https://aws-tc-largeobjects.s3-us-west-2.amazonaws.com/DEV-AWS-MO-GCNv2/FlaskApp.zip
          unzip FlaskApp.zip
          cd FlaskApp/
          yum -y install python3-pip
          pip install -r requirements.txt
          yum -y install stress
          export PHOTOS_BUCKET=${SUB_PHOTOS_BUCKET}
          export AWS_DEFAULT_REGION=<INSERT REGION HERE>
          export DYNAMO_MODE=on
          FLASK_APP=application.py /usr/local/bin/flask run --host=0.0.0.0 --port=80
3.3 Types of EC2 Instances
flowchart TD
  EC2((EC2 Family))
  E1(Gen Purpose)
  E2(Compute Optimized)
  E3(Storage Optimized)
  E4(Memory/RAM Optimized)
  E5(Accelerated Computing)

  U1[Web Servers]
  U2[ML/DL in High power CPU]
  U3[MongoDB/NoSQL DBs]
  U4[Capable of processing<br>large workloads<br>in memory]
  U5[Workloads<br>needing GPUs]

  EC2 --> E1
  EC2 --> E2
  EC2 --> E3
  EC2 --> E4
  EC2 --> E5

  E1 --> U1
  E2 --> U2
  E3 --> U3
  E4 --> U4
  E5 --> U5
3.3: Container Services on AWS
AWS offers a broad spectrum of compute offerings that give you the flexibility to choose the right tool for the right job. The three main categories of compute are virtual machines, containers, and serverless. There is no one-size-fits-all service because it depends on your needs.The key is to understand what each option has to offer in order to build a more appropriate cloud architecture for your use case. In this unit, you learn about containers and how to run them on AWS.Containers can host a variety of different workloads, including web applications, lift and shift migrations, distributed applications, and streamlining of development, test, and production environments.
WHAT IS A CONTAINER?
While containers are often referred to as a new technology, the idea started in the 1970s with certain Linux kernels having the ability to separate their processes through isolation. At the time, this was configured manually, making operations complex.With the evolution of the open source software community, containers evolved. Today, containers are used as a solution to problems of traditional compute, including the issue of getting software to run reliably when it moves from one compute environment to another.
A container is a standardized unit that packages up your code and all of its dependencies. This package is designed to run reliably on any platform, because the container creates its own independent environment. This makes it easy to carry workloads from one place to another, such as from development to production or from on-premises to the cloud.
WHAT IS DOCKER?
When you hear the word container, you may associate it with Docker. Docker is a popular container runtime that simplifies the management of the entire operating system stack needed for container isolation, including networking and storage. Docker makes it easy to create, package, deploy, and run containers.
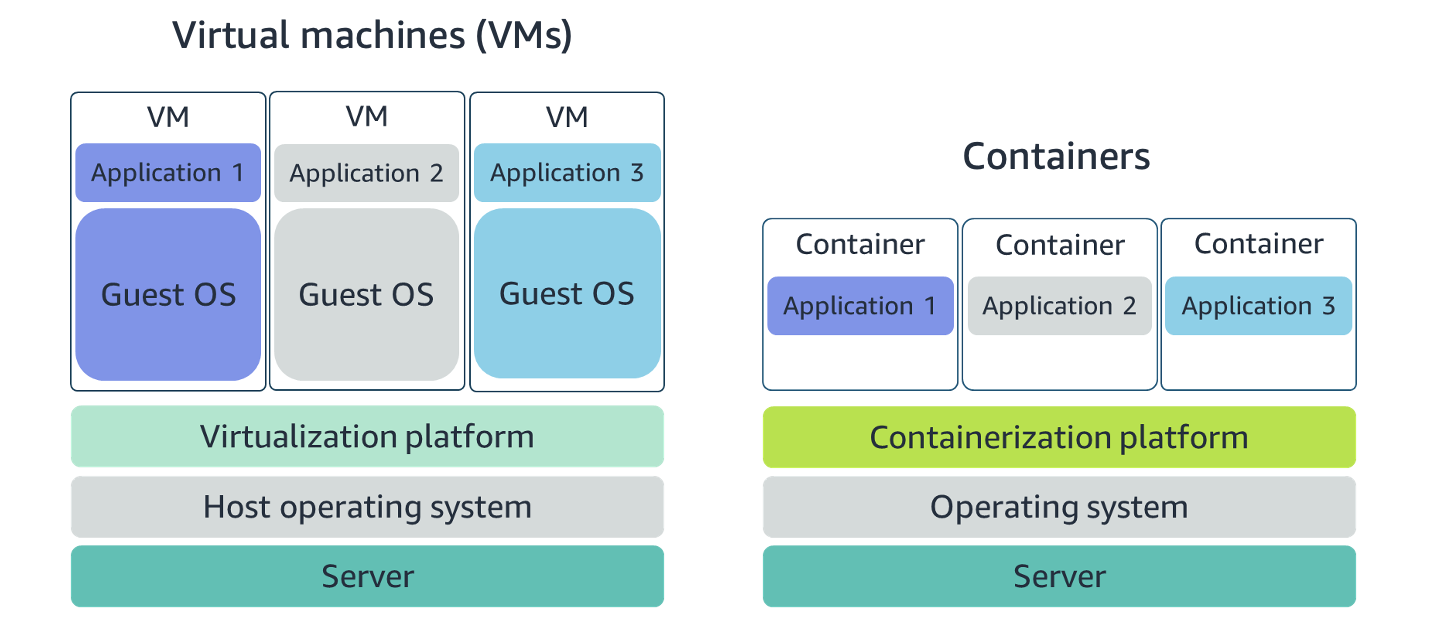
Containers share the same operating system and kernel as the host they exist on, whereas virtual machines contain their operating system. Since each virtual machine has to maintain a copy of an operating system, there’s a degree of wasted space.A container is more lightweight. They spin up quicker, almost instantly. This difference in startup time becomes instrumental when designing applications that need to scale quickly during input/output (I/O) bursts.While containers can provide speed, virtual machines offer you the full strength of an operating system and offer more resources, like package installation, a dedicated kernel, and more.
ORCHESTRATE CONTAINERS
In AWS, containers run on EC2 instances. For example, you may have a large instance and run a few containers on that instance.While running one instance is easy to manage, it lacks high availability and scalability. Most companies and organizations run many containers on many EC2 instances across several Availability Zones.If you’re trying to manage your compute at a large scale, you need to know:
- How to place your containers on your instances.
- What happens if your container fails.
- What happens if your instance fails.
- How to monitor deployments of your containers.
This coordination is handled by a container orchestration service. AWS offers two container orchestration services: Amazon Elastic Container Service (ECS) and Amazon Elastic Kubernetes Service (EKS).
MANAGE CONTAINERS WITH AMAZON ELASTIC CONTAINER SERVICE (AMAZON ECS)
Amazon ECS is an end-to-end container orchestration service that allows you to quickly spin up new containers and manage them across a cluster of EC2 instances.
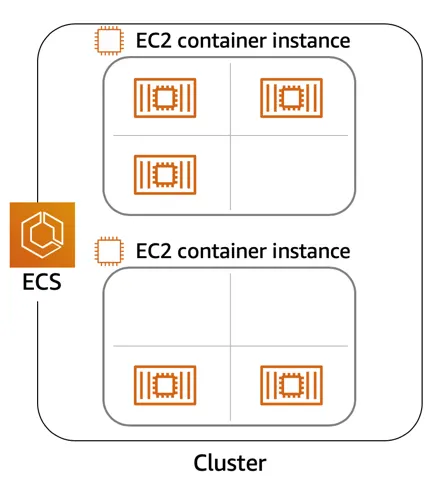
To run and manage your containers, you need to install the Amazon ECS Container Agent on your EC2 instances. This agent is open source and responsible for communicating back to the Amazon ECS service about cluster management details. You can run this agent on both Linux and Windows AMIs. An instance with the container agent installed is often called a container instance.
Once the Amazon ECS container instances are up and running, you can perform actions that include, but are not limited to, launching and stopping containers, getting cluster state, scaling in and out, scheduling the placement of containers across your cluster, assigning permissions, and meeting availability requirements.
To prepare your application to run on Amazon ECS, you create a task definition. The task definition is a text file, in JSON format, that describes one or more containers. A task definition is similar to a blueprint that describes the resources you need to run that container, such as CPU, memory, ports, images, storage, and networking information.
Here is a simple task definition that you can use for your corporate director application. In this example, the runs on the Nginx web server.
Task definition
{

     "family": "webserver",

     "containerDefinitions": [ {

          "name": "web",

          "image": "nginx",

          "memory": "100",

          "cpu": "99"

     } ],

     "requiresCompatibilities": [ "FARGATE" ],

     "networkMode": "awsvpc",

     "memory": "512",

     "cpu": "256"

}
Summary: ECS
## Amazon ECS (Elastic Container Service):
- What it is: A fully managed container orchestration service provided by AWS.
- Technology: ECS is an AWS-native service and does not use Kubernetes. Instead, it uses its own orchestration technology.
- Docker integration: ECS works directly with Docker containers, so if you're familiar with Docker, it's relatively straightforward to use ECS. AWS handles a lot of the complex setup, such as networking and container placement, for you.

## How ECS Works:
- Container Instances (EC2 instances): In ECS, when you launch a cluster of EC2 instances, each instance runs the ECS agent. This agent is responsible for running and managing the containers on that instance. These EC2 instances are called container instances.
- Tasks: A task is an instantiation of a container or group of containers. It’s how ECS defines a running containerized application. For example, if you launch an application with multiple containers, ECS defines it as a task.
- Fargate: ECS can also use Fargate, which is a serverless compute engine. With Fargate, you don't even need to manage EC2 instances; AWS runs the containers for you in a completely managed environment.

## Key Points:
- Native to AWS: ECS is built directly on AWS, and AWS takes care of much of the complexity (like networking, scaling, and load balancing) for you.
- No Kubernetes: ECS uses AWS-native orchestration, not Kubernetes.
- Terminology: Containers running on ECS are called tasks.
Summary: EKS
## Amazon EKS (Elastic Kubernetes Service):
- What it is: A fully managed service that runs Kubernetes clusters on AWS.
- Technology: EKS uses Kubernetes, an open-source container orchestration tool originally developed by Google. While ECS is AWS-native, EKS leverages Kubernetes' widespread adoption and flexibility.
- Docker integration: EKS runs Docker containers, but it uses Kubernetes to manage and orchestrate them, instead of AWS-native orchestration technology.
## How EKS Works:
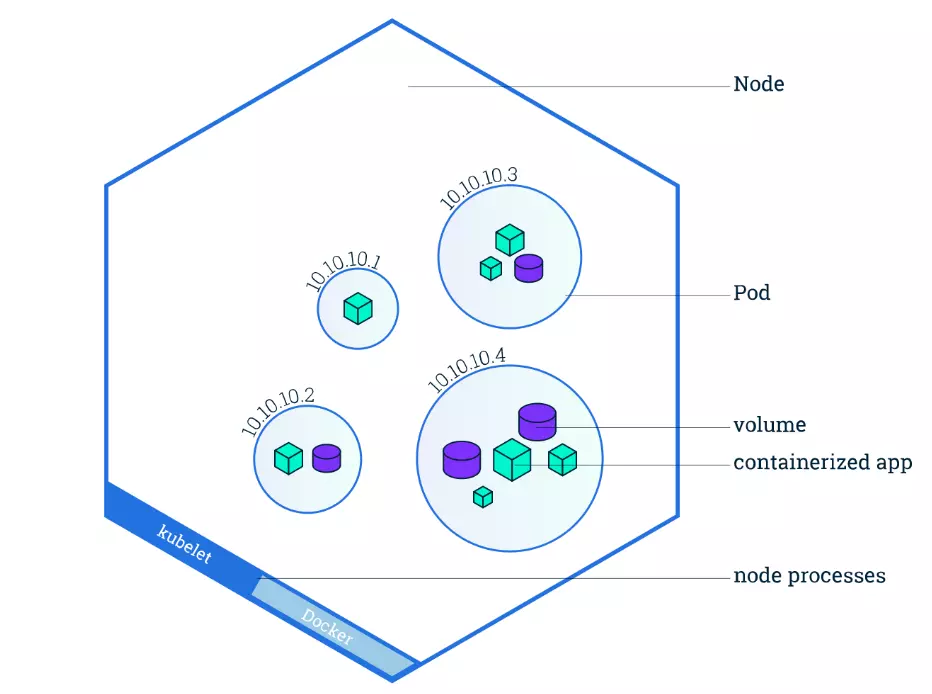
- Worker Nodes (EC2 instances): In EKS, the EC2 instances are called worker nodes, and they run your containers. These worker nodes are part of a Kubernetes cluster.
- Pods: In Kubernetes (and therefore in EKS), a pod is the smallest deployable unit. A pod can contain one or more containers that are tightly coupled. Think of a pod as the Kubernetes equivalent of a task in ECS.
- Control Plane: EKS manages the Kubernetes control plane for you. The control plane is responsible for making scheduling decisions, scaling, and managing the state of the Kubernetes cluster (worker nodes, pods, etc.).
## Key Points:
- Kubernetes-based: EKS runs on Kubernetes, which means you get access to the full set of Kubernetes features, such as advanced scheduling, load balancing, service discovery, and much more.
- More Complex but Flexible: Since Kubernetes is a flexible and powerful orchestration tool, you get more control over how your containers run, but it also comes with more complexity compared to ECS.
- Terminology: Containers running in EKS are part of a pod, not a task.USE KUBERNETES WITH AMAZON ELASTIC KUBERNETES SERVICE (AMAZON EKS)
Kubernetes is a portable, extensible, open source platform for managing containerized workloads and services. By bringing software development and operations together by design, Kubernetes created a rapidly growing ecosystem that is very popular and well established in the market.If you already use Kubernetes, you can use Amazon EKS to orchestrate these workloads in the AWS Cloud.Amazon EKS is conceptually similar to Amazon ECS, but there are some differences.
An EC2 instance with the ECS Agent installed and configured is called a container instance. In Amazon EKS, it is called a worker node.
An ECS Container is called a task. In the Amazon EKS ecosystem, it is called a pod.
While Amazon ECS runs on AWS native technology, Amazon EKS runs on top of Kubernetes.
If you have containers running on Kubernetes and want an advanced orchestration solution that can provide simplicity, high availability, and fine-grained control over your infrastructure, Amazon EKS is the tool for you.
Terminology Comparison - ECS vs EKS
| ECS | EKS |
|---|---|
EC2 Instances where containers are run EC2 Container Instances |
EC2 Instances where containers run Worker Nodes |
A task refers to a set of one or more containers that are scheduled together |
A pod - the smallest deployable unit and equivalent of task in ECS - consists of one or more containers that share resources |
Summary: In ECS, the EC2 instances where containers run are called container instances because they have the ECS agent installed to manage tasks |
Summary: In EKS (Kubernetes), the EC2 instances are called worker nodes, and they are part of the broader Kubernetes cluster. Kubernetes distributes containers (in the form of pods) to these nodes. |
3.4 Serverless and AWS Lambda
REMOVE THE UNDIFFERENTIATED HEAVY LIFTING
If you run your code on Amazon EC2, AWS is responsible for the physical hardware and you are responsible for the logical controls, such as guest operating system, security and patching, networking, security, and scaling.
If you run your code in containers on Amazon ECS and Amazon EKS, AWS is responsible for more of the container management, such as deploying containers across EC2 instances and managing the container cluster.
However, when running ECS and EKS on EC2, you are still responsible for maintaining the underlying EC2 instances.
If you want to deploy your workloads and applications without having to manage any EC2 instances, you can do that on AWS with serverless compute.
GO SERVERLESS
Every definition of serverless mentions four aspects.
- No servers to provision or manage.
- Scales with usage.
- You never pay for idle resources.
- Availability and fault tolerance are built-in.
With serverless, spend time on the things that differentiate your application, rather than spending time on ensuring availability, scaling, and managing servers.AWS has several serverless compute options, including AWS Fargate and AWS Lambda.
EXPLORE SERVERLESS CONTAINERS WITH AWS FARGATE
Amazon ECS and Amazon EKS enable you to run your containers in two modes.
- Amazon EC2 mode
- AWS Fargate mode
AWS Fargate is a purpose-built serverless compute engine for containers. Fargate scales and manages the infrastructure, allowing developers to work on what they do best: application development.It achieves this by allocating the right amount of compute, eliminating the need to choose and handle EC2 Instances and cluster capacity and scaling. Fargate supports both Amazon ECS and Amazon EKS architecture and provides workload isolation and improved security by design.
AWS Fargate abstracts the EC2 instance so you’re not required to manage it. However, with AWS Fargate, you can use all the same ECS primitives, APIs, and AWS integrations. It natively integrates with AWS Identity and Access Management (IAM) and Amazon Virtual Private Cloud (VPC). Having native integration with Amazon VPC allows you to launch Fargate containers inside your network and control connectivity to your applications.
RUN YOUR CODE ON AWS LAMBDA
If you want to deploy your workloads and applications without having to manage any EC2 instances or containers, you can use AWS Lambda.AWS Lambda lets you run code without provisioning or managing servers or containers. You can run code for virtually any type of application or backend service, including data processing, real-time stream processing, machine learning, WebSockets, IoT backends, mobile backends, and web apps, like your corporate directory app!
AWS Lambda requires zero administration from the user. You upload your source code and Lambda takes care of everything required to run and scale your code with high availability. There are no servers to manage, bringing you continuous scaling with subsecond metering and consistent performance.
HOW LAMBDA WORKS
There are three primary components of a Lambda function: the trigger, code, and configuration.The code is source code, that describes what the Lambda function should run. This code can be authored in three ways.
You create the code from scratch.
You use a blueprint that AWS provides.
You use same code from the AWS Serverless Application Repository, a resource that contains sample applications, such as “hello world” code, Amazon Alexa Skill sample code, image resizing code, video encoding, and more.
When you create your Lambda function, you specify the runtime you want your code to run in. There are built-in runtimes such as Python, Node.js, Ruby, Go, Java, .NET Core, or you can implement your Lambda functions to run on a custom runtime.The configuration of a Lambda function consists of information that describes how the function should run. In the configuration, you specify network placement, environment variables, memory, invocation type, permission sets, and other configurations. To dive deeper into these configurations, check out the resources section of this unit.Triggers describe when the Lambda function should run.
A trigger integrates your Lambda function with other AWS services, enabling you to run your Lambda function in response to certain API calls that occur in your AWS account. This makes you quicker to respond to events in your console without having to perform manual actions.All you need is the what, how, and when of a Lambda function to have functional compute capacity that runs only when you need it to.Amazon’s CTO, Werner Vogels, says, “No server is easier to manage than no server.” This quote summarizes the convenience you can have when running serverless solutions, like AWS Fargate and AWS Lambda.
In the next unit, you apply all the information you’ve learned about Amazon EC2, Amazon ECS and Amazon EKS, and AWS Fargate and learn the use cases for each service.
AWS Lambda function handler
The AWS Lambda function handler is the method in your function code that processes events. When your function is invoked, Lambda runs the handler method. When the handler exits or returns a response, it becomes available to handle another event.You can use the following general syntax when creating a function handler in Python:
def handler_name(event, context):
  ...
  return some_value
NAMING
The Lambda function handler name specified at the time you create a Lambda function is derived from the following:the name of the file in which the Lambda handler function is locatedthe name of the Python handler functionA function handler can be any name; however, the default on the Lambda console is lambda_function.lambda_handler. This name reflects the function name as lambda_handler, and the file where the handler code is stored in lambda_function.py.If you choose a different name for your function handler on the Lambda console, you must update the name on the Runtime settings pane.
BILLING GRANULARITY
AWS Lambda lets you run code without provisioning or managing servers, and you pay only for what you use. You are charged for the number of times your code is triggered (requests) and for the time your code executes, rounded up to the nearest 1ms (duration). AWS rounds up duration to the nearest millisecond with no minimum execution time. With this pricing, it can be very cost effective to run functions whose execution time is very low, such as functions with durations under 100ms or low latency APIs. For more information, see AWS News Blog .
SOURCE CODE
This video used a small amount of sample code illustrating a pattern for lazily generating assets using AWS Lambda and Amazon S3. If you’re looking to deploy a service to resize images to production, consider using the new release
Serverless Image Handler which is a robust solution to handle image manipulation and can be deployed via an AWS CloudFormation template.
You can find a tutorial on creating the AWS Lambda function as well as the code used in the AWS Lambda demo here: see
3.5 Notes from Computing Quiz
- EC2 instances are nothing but
Virtual Machinesor resizable compute capacity in the cloud. One can run many dockercontainersin a single virtual machine or EC2 instance - EC2 Instance type indicate the following:
instance familyandinstance size. E.g.:c5.large–> c - compute optimized, c5 - th generation, large - indicates instance size - AMI image is to EC2 instance is what a cake recipe is to a cake. A live instantiation of the cake recipe is the cake. An implemented version of the AMI image is the EC2 instance. AMI is the OS in the EC2 instance. AMI is the template that contains the software that is required to launch an instance.
- AWS Fargate vs AWS EC2 in ECS: For Fargate, AWS manages the provision, configuration and scale of the clusters. For
EC2 in ECS, user manages the provisioning, configuration and scale of EC2 instance cluster - Serverless services do not require VPC. But can be included in a VPC of your own account.
4 Networking on AWS
4.1 Introduction to Networking in AWS
WHAT IS NETWORKING?
Networking is how you connect computers around the world and allow them to communicate with one another. In this trail, you’ve already seen a few examples of networking. One is the AWS global infrastructure. AWS has created a network of resources using data centers, Availability Zones, and Regions.
KNOW THE NETWORKING BASICS
Think about sending a letter. When sending a letter, there are three pieces of information you need. - Sender - Receiver - Payload content
Let’s go further. Each address must contain information such as:
- Name of sender and recipient
- Street
- City
- State or province
- Zip, area, or postal code
- Country
You need all parts of an address to ensure that your letter gets to its destination. Without the correct address, postal workers are not able to properly deliver the message. In the digital world, computers handle the delivery of messages in a similar way. This is called routing.
WHAT ARE IP ADDRESSES?
In order to properly route your messages to a location, you need an address. Just like each home has a mail address, each computer has an IP address. However, instead of using the combination of street, city, state, zip code, and country, the IP address uses a combination of bits, 0s and 1s.
It’s called 32-bit because you have 32 digits of 0s and 1s.
WHAT IS IPV4 NOTATION?
Typically, you don’t see an IP address in this binary format. Instead, it’s converted into decimal format and noted as an Ipv4 address.
In the diagram below, the 32 bits are grouped into groups of 8 bits, also called octets. Each of these groups is converted into decimal format separated by a period.

In the end, this is what is called an Ipv4 address. This is important to know when trying to communicate to a single computer. But remember, you’re working with a network. This is where CIDR Notation comes in.
USE CIDR NOTATION
192.168.1.30 is a single IP address. If you wanted to express IP addresses between the range of 192.168.1.0 and 192.168.1.255, how can you do that?
One way is by using Classless Inter-Domain Routing (CIDR) notation. CIDR notation is a compressed way of specifying a range of IP addresses. Specifying a range determines how many IP addresses are available to you.
CIDR notation looks like this:
192.168.1.0/24It begins with a starting IP address and is separated by a forward slash (the “/” character) followed by a number. The number at the end specifies how many of the bits of the IP address are fixed. In this example, the first 24 bits of the IP address are fixed. The rest are flexible.
# first 24 of the 32 bits are fixed
192.168.1.0/24

# 192 - Fixed
# 168 - Fixed
# 1 - Fixed
# last 8 bits - Flexible

# each of the last 8 bits can take 0 or 1 - so two choices.
# hence 2^8 = 256 IP addresses possible
When working with networks in the AWS Cloud, you choose your network size by using CIDR notation. In AWS, the smallest IP range you can have is /28, which provides you 16 IP addresses. The largest IP range you can have is a /16, which provides you with 65,536 IP addresses.
My Interactions with ChatGPT on Networking
# Q) What should be the right CIDR range to choose for my VPC? What factors dictate that?
When should I choose a CIDR /24 or CIDR/28 and CIDR/16 range of ip addresses?

Ans:
Factors that decide the range of the IP addresses:
1. Size of the Network
2. Subnets
3. Growth and Scalability
4. Private vs Public Subnets
5. Peering and Inter-VPC Connectivity
6. Service Endpoints & NAT Gateways

Summary:
/16: Best for large networks with many subnets, services, or where future scaling is critical.
/24: Suitable for mid-sized networks with a moderate number of subnets.
/28: Best for small networks, testing environments, or scenarios with very few resources.

Note: On `Subnets`

AWS reserves 5 IP addresses in every subnet, so in smaller CIDR blocks like /28 (where 16 IP addresses are available), you only have 11 usable IPs. Remaining 5 get used for subnets
4.2 Introduction to AWS VPC and its main services
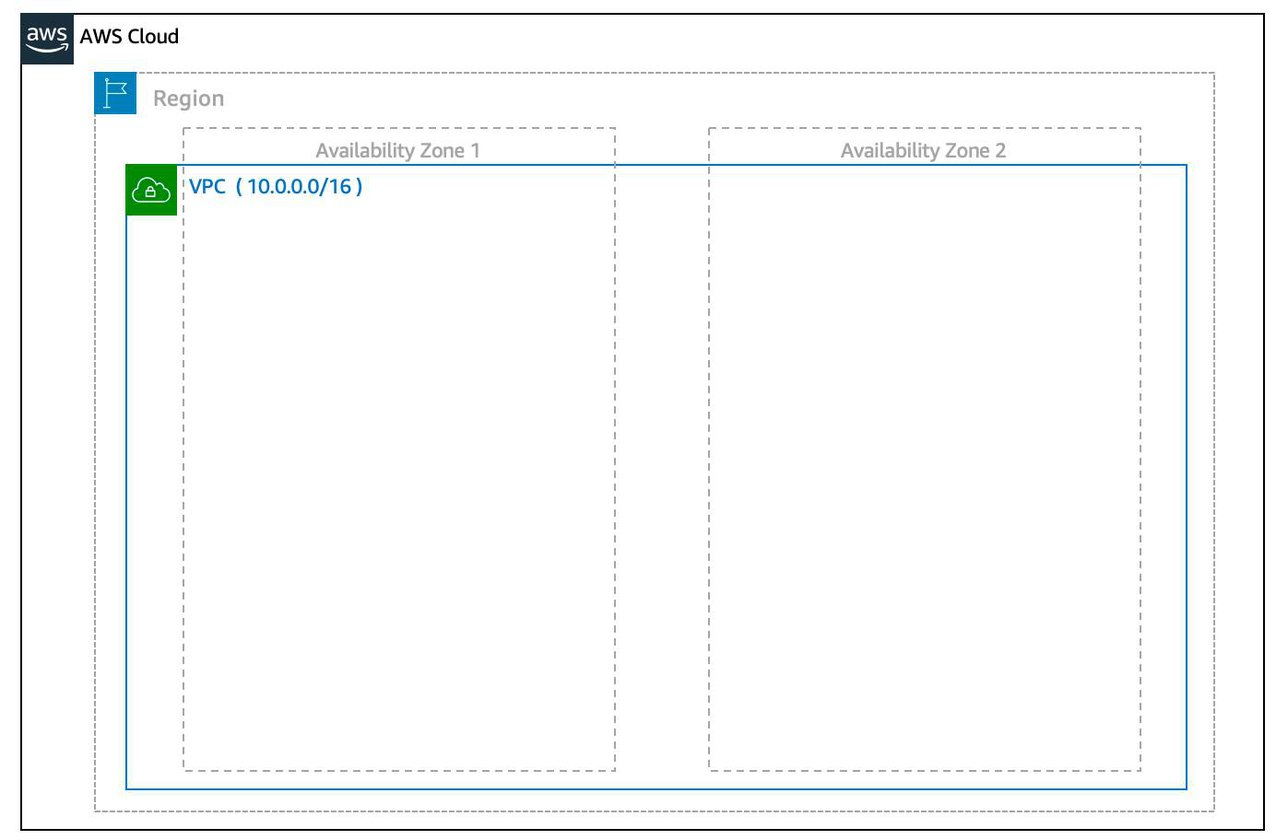
3 Requirements to set up a VPC: 1. The name of your VPC. 2. A Region for your VPC to live in. Each VPC spans multiple Availability Zones within the Region you choose. 3. A IP range for your VPC in CIDR notation. This determines the size of your network. Each VPC can have up to four /16 IP ranges.
4.2.1 Create a Subnet:
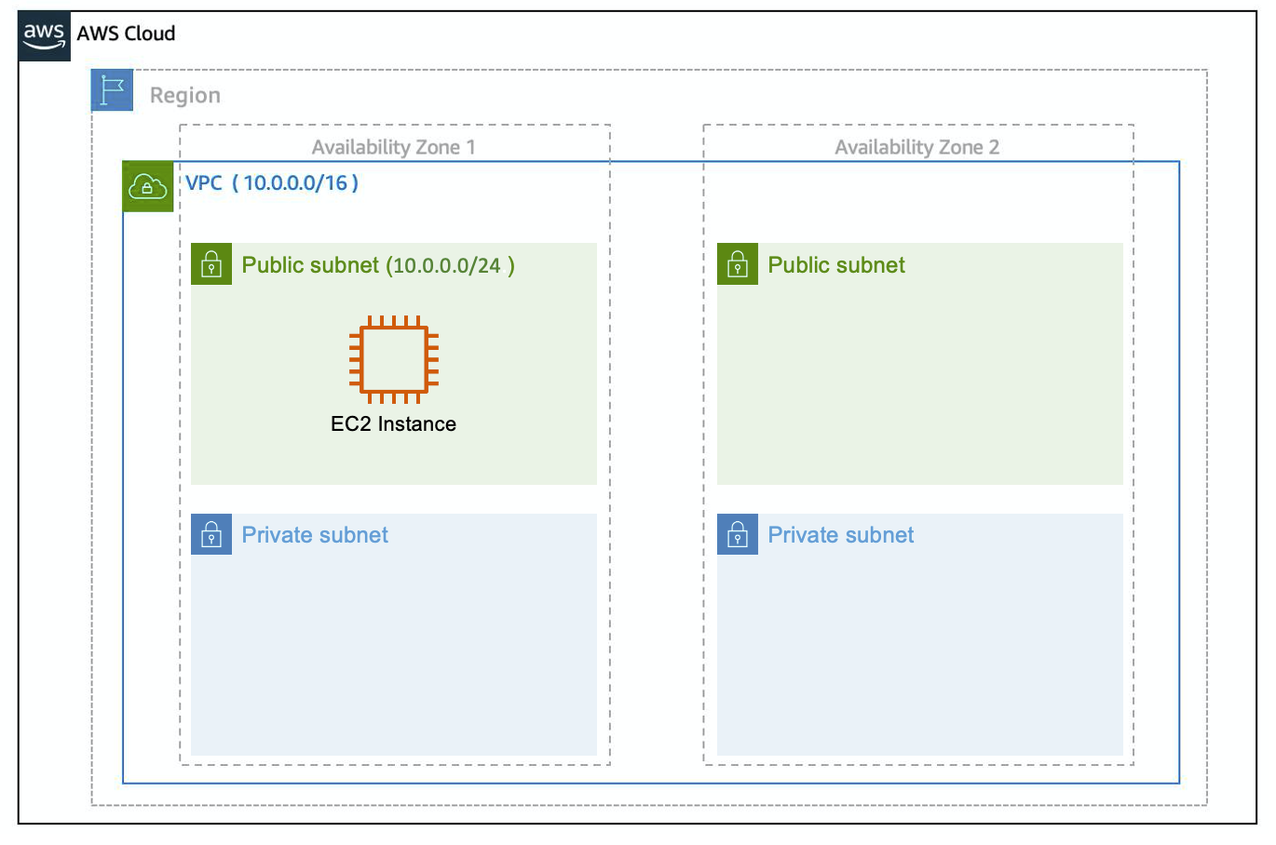
After you create your VPC, you need to create subnets inside of this network. Think of subnets as smaller networks inside your base network—or virtual area networks (VLANs) in a traditional, on-premises network. In an on-premises network, the typical use case for subnets is to isolate or optimize network traffic. In AWS, subnets are used for high availability and providing different connectivity options for your resources.
Subnet is a subset of VPC. The size of Both Subnets and VPCs are indicated with CIDR notation. A VPC CIDR range is always bigger than its subnet CIDR range.
When you create a subnet, you need to choose three settings. 1. The VPC you want your subnet to live in, in this case VPC (10.0.0.0/16). 2. The Availability Zone you want your subnet to live in, in this case AZ1. 3. A CIDR block for your subnet, which must be a subset of the VPC CIDR block, in this case 10.0.0.0/24.
When you launch an EC2 instance, you launch it inside a subnet, which will be located inside the Availability Zone you choose.
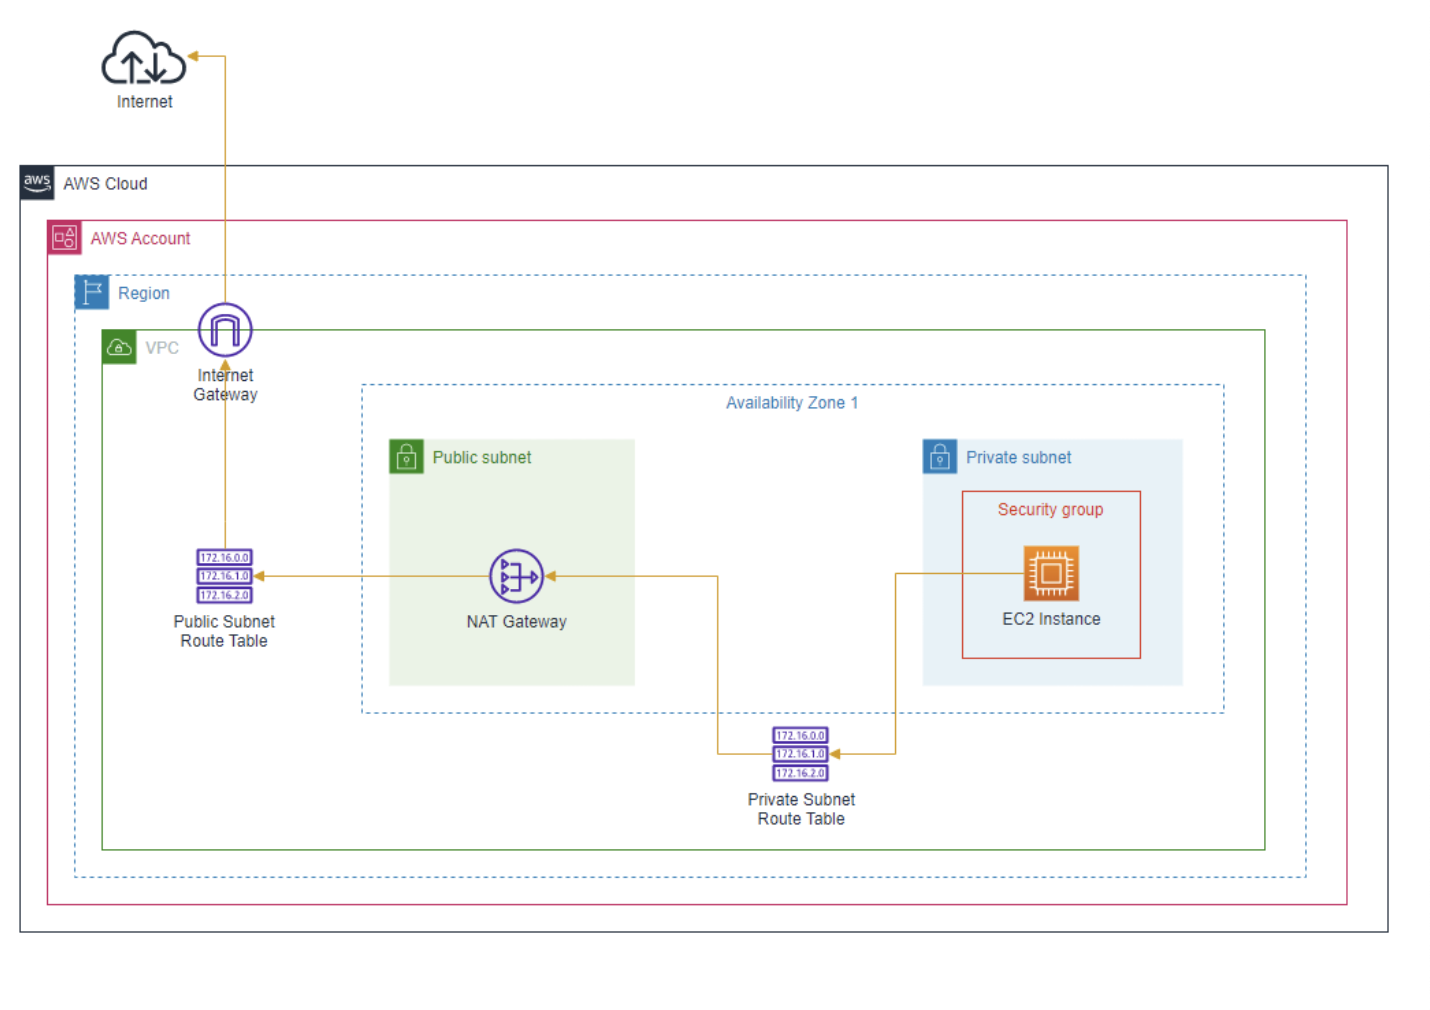
Below is an image of an EC2 instance residing inside a public subnet
How to maintain high availability with a VPC?
- When you create your subnets, keep high availability in mind. In order to maintain redundancy and fault tolerance, create at least two subnets configured in two different Availability Zones.
Reserved IPs For AWS to configure your VPC appropriately, AWS reserves five IP addresses in each subnet. These IP addresses are used for routing, Domain Name System (DNS), and network management.
What are those 5 Reserved IPs at every Subnet?
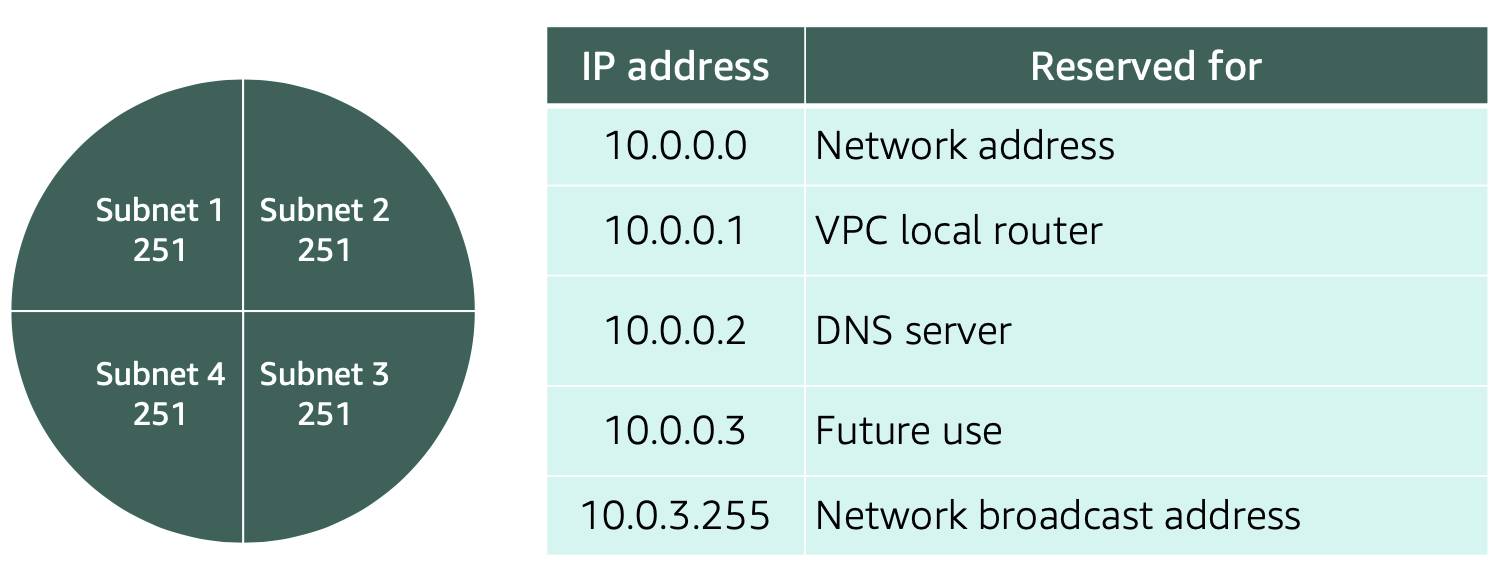
For example, consider a VPC with the IP range 10.0.0.0/22. The VPC includes
1,024 total IP addresses. This is divided into four equal-sized subnets, each with a/24IP range with256 IP addresses. Out of each of those IP ranges, there are only 251 IP addresses that can be used because AWS reserves five.
Since AWS reserves these five IP addresses, it can impact how you design your network. A common starting place for those who are new to the cloud is to create a VPC with a IP range of /16 and create subnets with a IP range of /24. This provides a large amount of IP addresses to work with at both the VPC and subnet level.
4.2.2 What is built in Public and Private Subnets
Example Architecture Setup for Amazon.com or Facebook.com:


**Public-facing Load Balancer (ALB or NLB) in a public subnet**:

- The Load Balancer receives all incoming traffic (e.g., user requests to Amazon.com).
It distributes the traffic to a pool of web servers based on load and availability.

**Web Servers**:
- The web servers can be in either a public or private subnet. If they are in a public subnet, they have a public IP address but only accept traffic from the Load Balancer.
If they are in a private subnet, they do not have a public IP and can only receive traffic forwarded by the Load Balancer.


**Backend Components (databases, APIs, etc.) in private subnets**:
- These are isolated and only accessible from the web servers or other internal systems.
- They cannot be accessed directly from the internet, ensuring sensitive data and services are protected.

**NAT Gateway (optional for backend services)**:
- Any backend instances in the private subnet that need to initiate outbound traffic (e.g., for updates, API calls) do so through a NAT Gateway.

Summary:
- Web Servers (like Amazon.com and Facebook.com) do need to allow inbound traffic for users to access their websites. However, this traffic is typically handled in a controlled and secure manner, often through Load Balancers and strict security group rules.
- Backend systems, on the other hand, are usually hosted in private subnets and do not allow any unsolicited inbound traffic from the internet. They may make outbound requests through NAT Gateways or other secure channels.


The **key security principle** here is that inbound traffic is tightly controlled and usually mediated by a public-facing Load Balancer, while private subnets and backend systems remain isolated and protected from direct exposure to the internet.
4.3 Gateways
4.3.1 Internet Gateway
- To enable internet connectivity for your VPC, you need to create an internet gateway.
Think of this gateway as similar to a modem. Just as a modem connects your computer to the internet, the internet gateway connects your VPC to the internet. Unlike your modem at home, which sometimes goes down or offline, an internet gateway is highly available and scalable.
- After you create an internet gateway, you then need to attach it to your VPC.
4.3.2 Virtual Private Gateway
A virtual private gateway allows you to connect your AWS VPC to another private network. Once you create and attach a VGW to a VPC, the gateway acts as anchor on the AWS side of the connection. On the other side of the connection, you’ll need to connect a customer gateway to the other private network. A customer gateway device is a physical device or software application on your side of the connection.
Once you have both gateways, you can then establish an encrypted VPN connection between the two sides.
4.3.2 NAT Gateway
NAT Gateway stands for Network Address Translation Gateway. The name “NAT” is derived from the process of Network Address Translation, which allows a device (like an EC2 instance) with a private IP address to communicate with external systems (like the internet) by translating its private IP into a public IP for outbound traffic.
Why is it called “NAT Gateway”? Network Address Translation (NAT): This is the key process behind the name. NAT allows instances in a private subnet (with only private IP addresses) to send traffic to the internet by translating their private IP addresses to a public IP address as they pass through the NAT Gateway. Gateway: It acts as a “gateway” or bridge between instances in a private subnet and external destinations, like the internet.
Primary Function: Outbound Internet Traffic A NAT Gateway is primarily designed to allow outbound internet access from instances in a private subnet, while preventing inbound traffic from the internet. When an instance in a private subnet needs to download updates or communicate with a service on the internet, it sends the request to the NAT Gateway. The NAT Gateway then makes the request on behalf of the instance using its own public IP and routes the response back to the instance.
Important Characteristics: - Outbound-only: - NAT Gateway is designed for outbound traffic only from private subnets to the internet. It does not allow incoming traffic initiated from the internet to reach instances in private subnets.
- Security:
- Since instances behind a NAT Gateway do not have public IP addresses, they are not directly reachable from the internet, enhancing security.
Summary: NAT Gateway enables instances in private subnets to connect to the internet (e.g., to download updates or communicate with external APIs), but does not allow inbound internet traffic. It serves as a way to hide the private IP addresses of those instances from external systems while enabling them to make outgoing connections.
Outbound vs. Inbound Traffic Breakdown Outbound Traffic refers to traffic initiated by an instance (in your private subnet) that goes out to the internet. When you send a request to download an update or access an external API, this is outbound traffic because the instance is initiating the connection.
Inbound Traffic refers to traffic initiated from the internet towards your instance. For example, a web server accepting a request from an external user would be receiving inbound traffic.
Key Concept: Stateful Connections and Outbound Session NAT Gateways maintain stateful connections. When your instance starts a connection to the internet, the NAT Gateway tracks that connection. Any return traffic (like the update file) is automatically allowed because it is part of an ongoing session initiated by your instance. NAT Gateway does not allow new incoming connections initiated by the external source. It only forwards responses to requests that were initiated by the private instance (which keeps the session active).
4.4 Amazon VPC Routing and Security
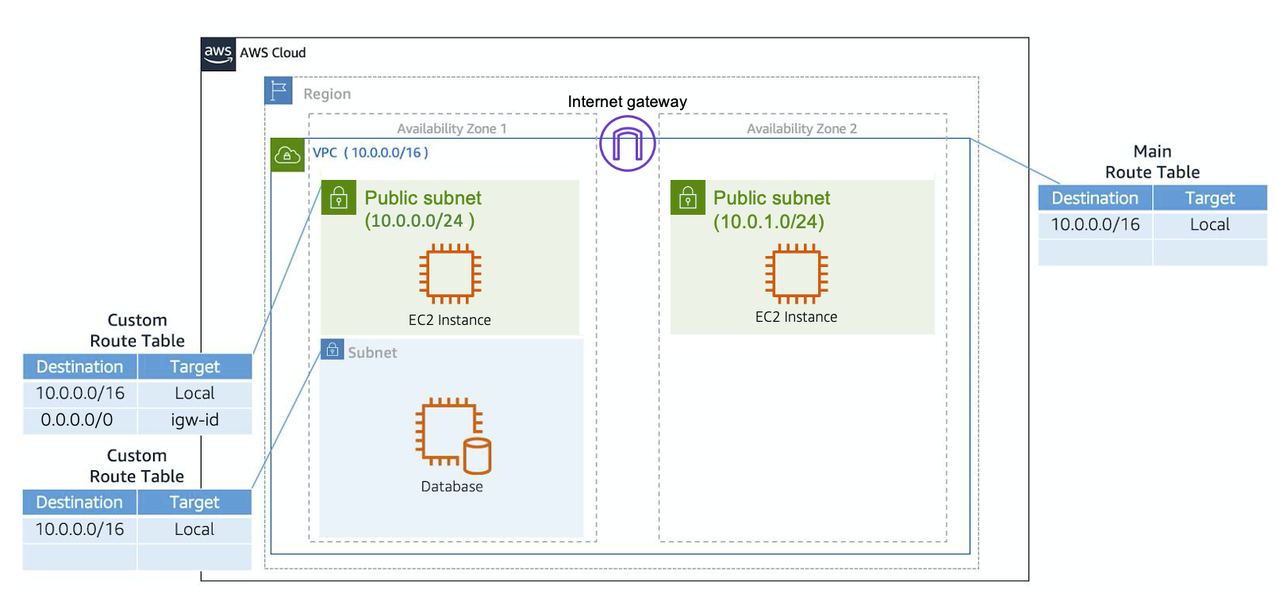
4.4.1 The Main Route Table
When you create a VPC, AWS creates a route table called the main route table. A route table contains a set of rules, called routes, that are used to determine where network traffic is directed. AWS assumes that when you create a new VPC with subnets, you want traffic to flow between them. Therefore, the default configuration of the main route table is to allow traffic between all subnets in the local network.
.png)
There are two main parts to this route table.
The destination, which is a range of IP addresses where you want your traffic to go. In the example of sending a letter, you need a destination to route the letter to the appropriate place. The same is true for routing traffic. In this case, the destination is the IP range of our VPC network.
The target, which is the connection through which to send the traffic. In this case, the traffic is routed through the local VPC network.
4.4.2 Custom Route Tables
- Custom Route Tables are Route Tables for specific subnets
- granular way to route your traffic for specific subnets.
If you associate a custom route table with a subnet, the subnet will use it instead of the main route table. By default, each custom route table you create will have the
localroute already inside it, allowing communication to flow between all resources and subnets inside the VPC.
4.4.3 Secure Your Subnets with Network ACLs
A NACL (Network Access Control List) is a stateless firewall at the subnet level in AWS that controls inbound and outbound traffic to and from subnets.
Network ACL’s are considered stateless, so you need to include both the inbound and outbound ports used for the protocol. If you don’t include the outbound range, your server would respond but the traffic would never leave the subnet.
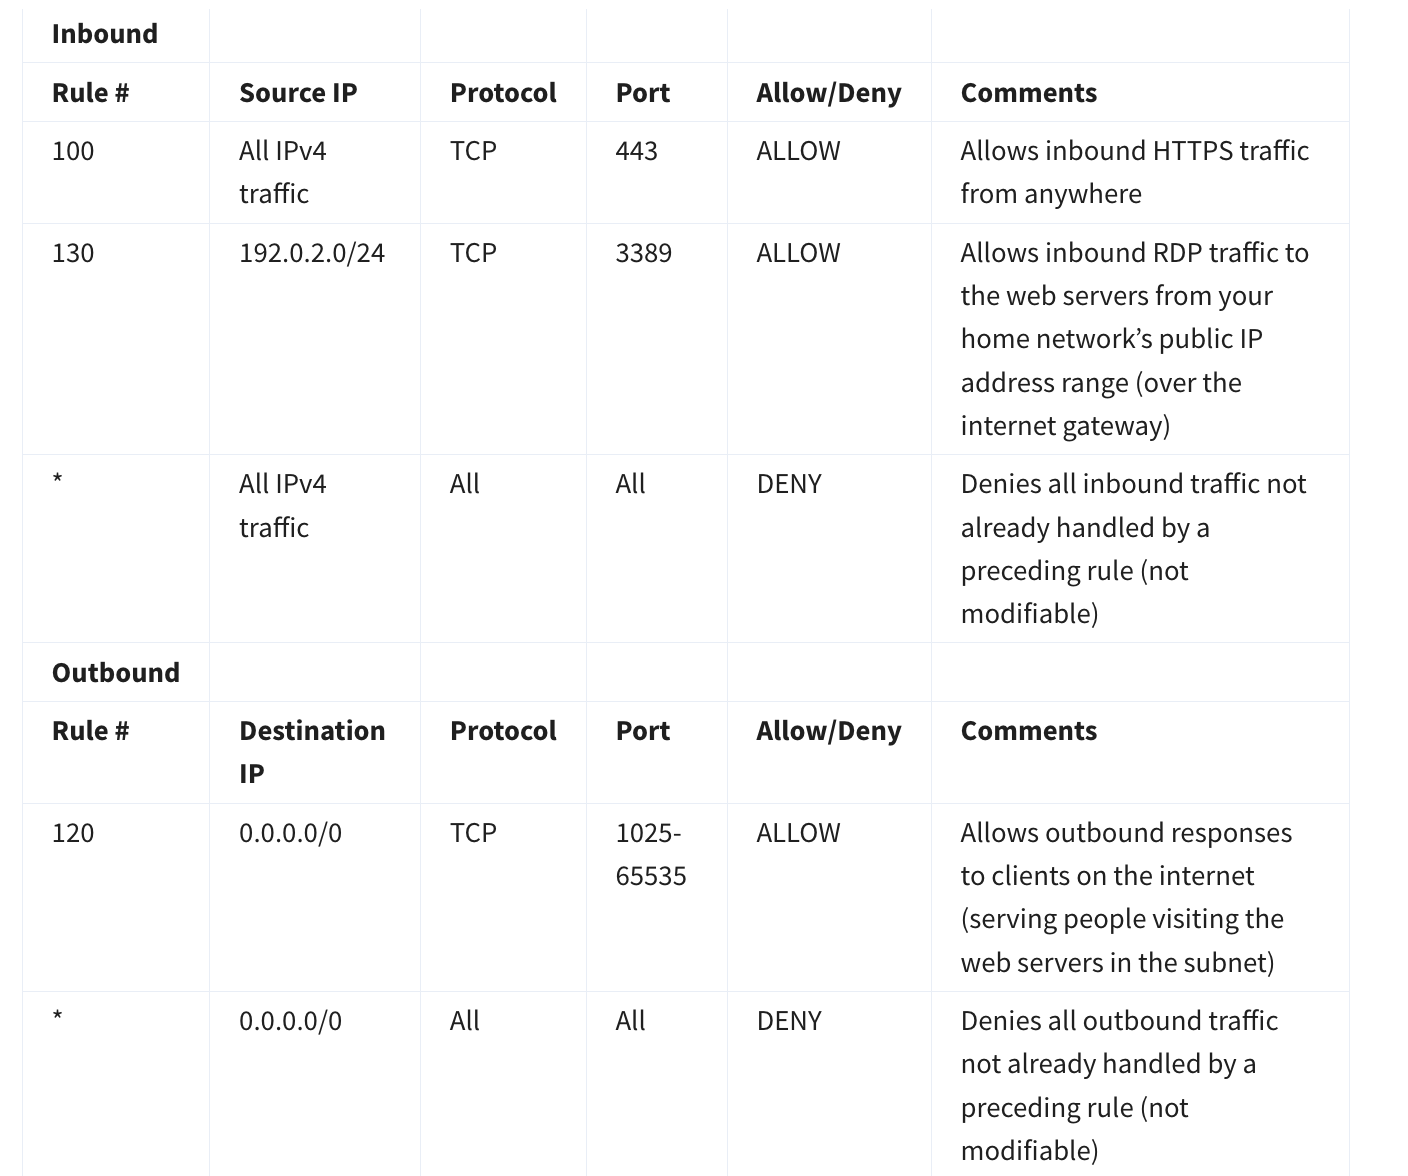
Note the
non modifiablerules in bothinboundandoutbound
4.4.4 Secure Your EC2 Instances with Security Groups
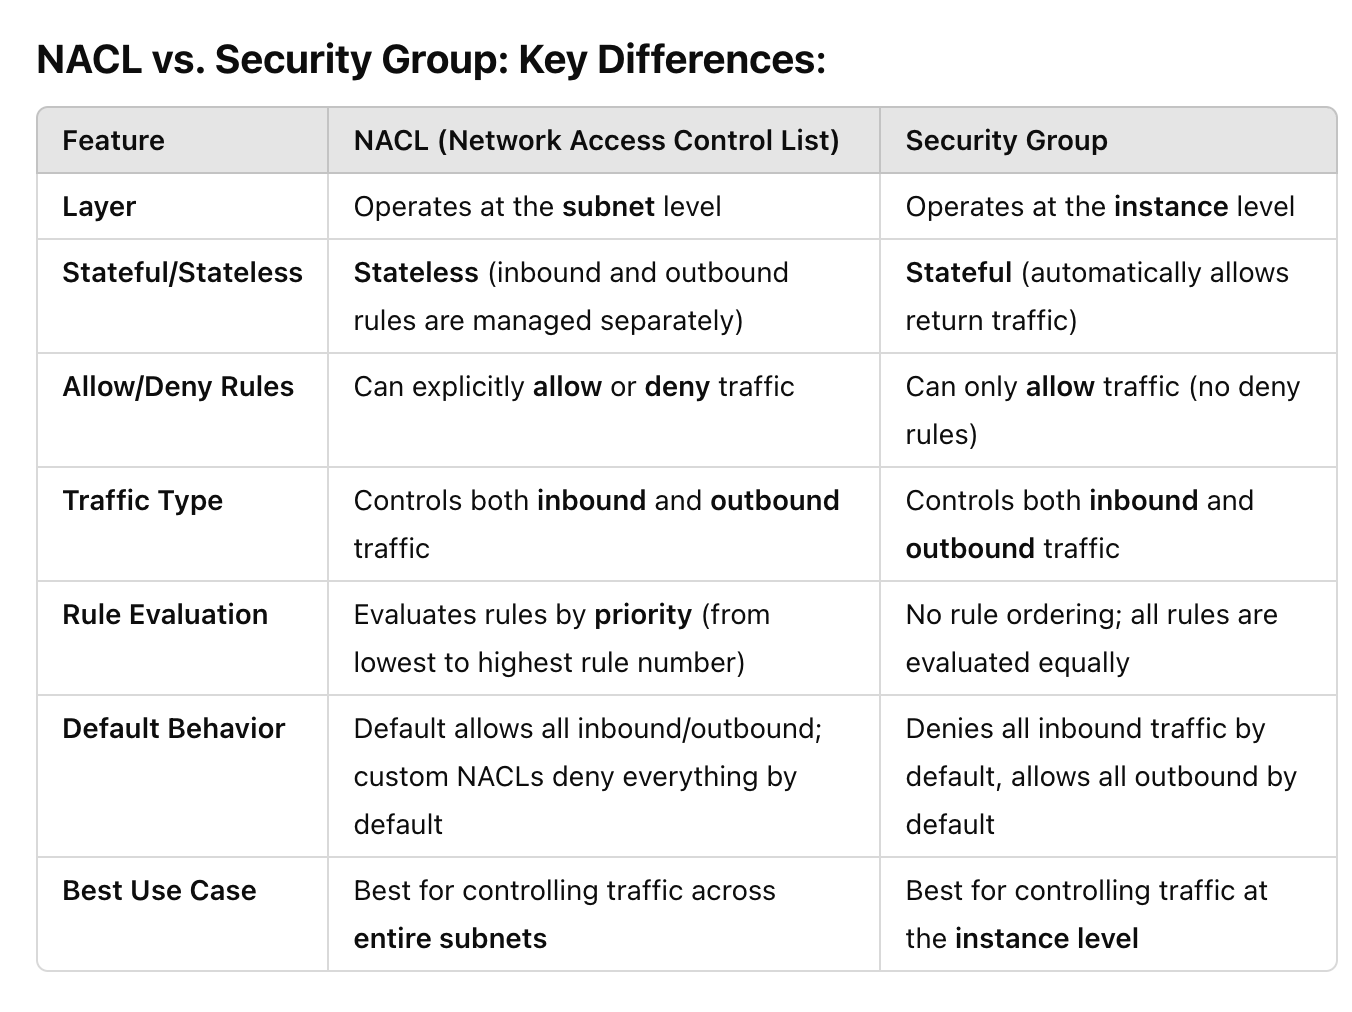
Default Security Group Behaviour: Denies all inbound traffic by default, allows all outbound by default
If you have a web server, you may need to accept HTTP and HTTPS requests to allow that type of traffic in through your security group. You can create an inbound rule that will allow port 80 (HTTP) and port 443 (HTTPS) as shown below.

4.4.5 Port 80 vs Port 443:
Q) 1. What does port 80 and port 443 signify?
2. What does HTTP request and HTTPS request ? How are these 2 requests different

> Port 80 (HTTP): When your browser makes an HTTP request over port 80, the communication is unencrypted.
- Anyone intercepting the data between the browser and server can read the content in plaintext.
- HTTP requests are typically used on websites where security is not a concern (e.g., static informational sites).

E.g.: `http://` websites

> Port 443 (HTTPS): When your browser makes an HTTPS request over port 443, the communication is encrypted using SSL/TLS. This means:
- The data is securely encrypted and can only be decrypted by the server and client.
- HTTPS requests are used on websites where security is important (e.g., banking, e-commerce, login forms).

E.g.: `https://` websites
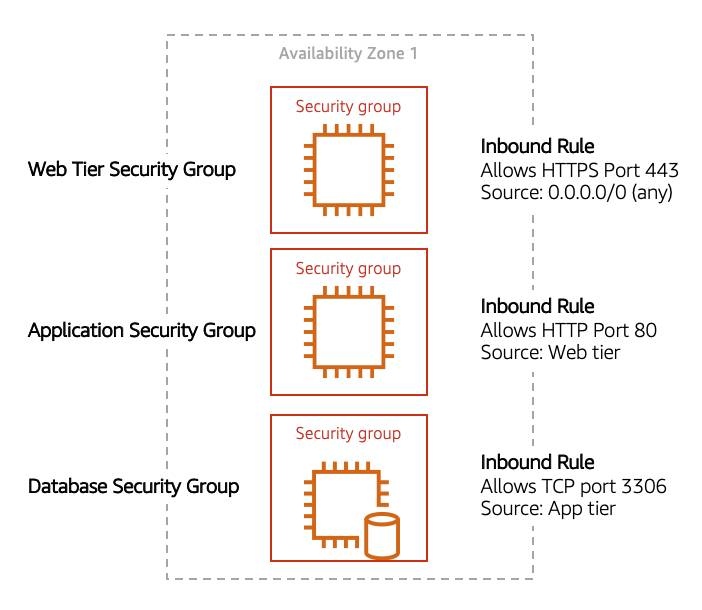
This example allows you to define three tiers and isolate each tier with the security group rules you define. In this case, you only allow internet traffic to the web tier over HTTPS, Web Tier to Application Tier over HTTP, and Application tier to Database tier over MySQL. This is different from traditional on-premises environments, in which you isolate groups of resources via VLAN configuration. In AWS, security groups allow you to achieve the same isolation without tying it to your network.
4.5 How an EC2 Instance in a Private Subnet reaches the Internet
4.6 10 Common network troubleshooting steps for Amazon VPC
Below is a list of configurations you should check if you ever have a public EC2 instance with a web application that is not loading as expected.
Internet gateway > Is IGW attached to VPC? > Without the internet gateway, no traffic will be allowed in or out of the VPC.
Route tables
Does the route table of the subnet that has the EC2 application have destination as
0.0.0.0/0and target asigw? This route allows outbound traffic to the internet and makes the subnet apublicsubnet
- Security groups
By default all inbound traffic is blocked. Make sure there are inbound rules allowing HTTP (port 80) and/or HTTPS (port 443) traffic from the internet (0.0.0.0/0). Also, verify that outbound rules allow traffic to leave the instance.
- Network Access Control Lists
Check the NACLs associated with the subnet that has the EC2 instance NACLs are stateless, so you must explicitly allow both inbound and outbound rules that allow the http and https rules to subnet
- Public IP address (Most important one :))
Ensure you have
auto-assign IP addresswhen launching EC2 instance
- HTTP vs HTTPS
Confirm that your application is accessible via the correct protocol. If your application is configured for HTTPS, ensure SSL/TLS certificates are correctly installed and configured. Also, check if the web browser is trying to connect via the wrong protocol (HTTP instead of HTTPS or vice versa). For this course, the application is operating via HTTP, double check that your browser is not trying to connect via HTTPS. You can do this by selecting the address bar in the browser and making sure the address starts with http and not https.
- User data script
If your instance uses a user data script to configure the application on launch, verify that the script has run successfully.
Check the instance logs (
/var/log/cloud-init.logor/var/log/cloud-init-output.log) for any errors that may have occurred during the execution of the user data script.
- Permissions (another important one)
Verify the permissions and roles attached to your EC2 instance. Ensure the instance has the necessary IAM roles and policies to access any required AWS services, such as S3, DynamoDB, or RDS.
- Personal network permissions
Ensure that your personal or corporate network does not have restrictions blocking access to the public IP address of your EC2 instance.
Some networks might have firewalls or proxy settings that could block outbound traffic to certain IP ranges or ports.
- Application Code Logs
Ensure that your application code is correctly deployed and running. Check the application’s logs to diagnose any runtime errors. Also, make sure the web server (e.g., Apache, Nginx) is installed and running.
4.7 Notes from Networking Quiz:
- For creating VPC, you need to choose a region. We can have multiple AZs and multiple subnets inside that VPC
- Route Table can be attached to subnets and the overall VPC. The route table attached to the VPC is typically called the
main route table - Custom Route Tables are for specific subnets
- If you have a resource in a public subnet, you need to attach an Internet Gateway to the VPC and create a route in the route table of the subnet to the internet gateway (then only it will be called a public subnet)
- By default, a
security groupblocks all incoming traffic and allows all outgoing traffic. It is stateful (meaning an result of an incoming traffic is allowed automatically) - The
default NACLis associated with all subnets in the VPC by default, allowing all traffic. Custom NACLs: If you create a custom NACL, it denies all traffic by default until you specify rules. You can associate custom NACLs with specific subnets to override the default NACL’s behavior.- Size of the network is determined by the
CIDRnotation./16is a larger network than/28
A Github Source for Week 2 Quiz
ChatGPT Interactions on NACL and Security Group
Q) Give me aws cli command to add NACL rules and security group rulesHere are AWS CLI commands to add NACL rules and Security Group rules:
1. Add Rules to a Network ACL (NACL):
To add an inbound or outbound rule to a Network ACL, you can use the aws ec2 create-network-acl-entry command.
Example Command for Adding an Inbound Rule to Allow HTTP Traffic:
aws ec2 create-network-acl-entry \
  --network-acl-id acl-0123456789abcdef0 \
  --ingress \
  --rule-number 100 \
  --protocol 6 \
  --port-range From=80,To=80 \
  --cidr-block 0.0.0.0/0 \
--rule-action allow--network-acl-id: The ID of the NACL.--ingress: Indicates that the rule is for inbound traffic (use--egressfor outbound).--rule-number: A unique number for the rule (rules are evaluated in order).--protocol: Protocol number (6for TCP,-1for all protocols).--port-range: The port range (in this case, HTTP traffic on port 80).--cidr-block: The source CIDR block.--rule-action: Whether toallowordenythe traffic.
Example Command for Adding an Outbound Rule to Allow All Traffic:
aws ec2 create-network-acl-entry \
  --network-acl-id acl-0123456789abcdef0 \
  --egress \
  --rule-number 101 \
  --protocol -1 \
  --port-range From=0,To=65535 \
  --cidr-block 0.0.0.0/0 \
  --rule-action allow
2. Add Rules to a Security Group:
To add inbound or outbound rules to a Security Group, use the aws ec2 authorize-security-group-ingress or authorize-security-group-egress command.
Example Command for Adding an Inbound Rule to Allow SSH (Port 22) from a Specific IP:
aws ec2 authorize-security-group-ingress \
  --group-id sg-0123456789abcdef0 \
  --protocol tcp \
  --port 22 \
  --cidr 203.0.113.0/32 \
--description "Allow SSH from admin IP"--group-id: The ID of the security group.--protocol: Protocol type (tcp,udp,icmp, etc.).--port: The port to allow (e.g.,22for SSH).--cidr: The CIDR block that is allowed access (a specific IP or range).--description: Optional, a brief description of the rule.
Example Command for Adding an Outbound Rule to Allow HTTPS (Port 443) to All IPs:
aws ec2 authorize-security-group-egress \
  --group-id sg-0123456789abcdef0 \
  --protocol tcp \
  --port 443 \
  --cidr 0.0.0.0/0 \
--description "Allow outbound HTTPS traffic"Tips:
- Remove Rules: Use
aws ec2 revoke-network-acl-entryoraws ec2 revoke-security-group-ingress/egressto remove existing rules. - List Rules: Use
aws ec2 describe-network-aclsoraws ec2 describe-security-groupsto view current rules.
5. Storage
5.1 Storage Types on AWS
3 Different AWS Storage Types: - block storage - file storage - object storage
5.1.1 File Storage
- Structure: Data is stored as files in a tree-like hierarchical directory structure (like a traditional file system).
Each file has metadata such as file name, file size, and the date the file was created. The file also has a path, for example, computer/Application_files/Cat_photos/cats-03.png. When you need to retrieve a file, your system can use the path to find it in the file hierarchy.
Every additional folder adds latency to the structure
Usecases: - Large content repositories - Development environments - User home directories
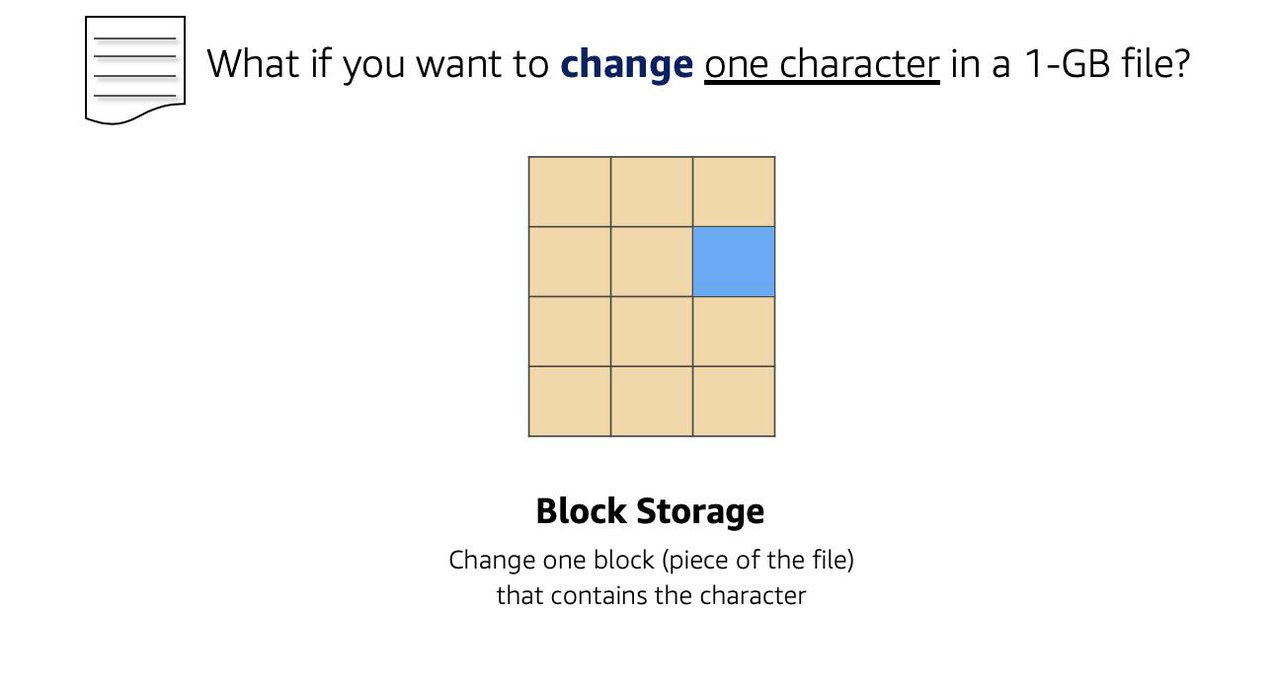
5.1.2 Block Storage
- While file storage treats files as a singular unit, block storage splits files into fixed-size chunks of data called blocks that have their own addresses. Since each block is addressable, blocks can be retrieved efficiently.
5.1.2 Object Storage
- Very similar to File Storage but no
hierarchicalstorage - Flat structure
- Each object is a file with a unique identifier. This identifier, along with any additional metadata, is bundled with the data and stored.
| File Storage | Object Storge |
|---|---|
| Hierarchy - YES; Folder or tree-like structure | Flat Structure. No hierarchy |
| Good for low-latency read-write | Good for high throughput |
| Edit a portion, you overwrite the whole file | Edit a portion, you overwrite the whole object |
| Amazon EFS | Amazon S3 |
5.2: Amazon EC2 Instance Store and Amazon Elastic Block Store
5.2.1 The two types of EC2 Instance Storage Options
flowchart TD
  A[[Temporary<br>Instance Store]]
  B[[Permanent<br>EBS]]
  C(Storage connected<br>to EC2)
  C --> A
  C --> B
5.2.2 How many EBS Volumes to every EC2 Instance
1 EC2 to Many EBS Volumes:
flowchart LR
  EC[EC2]
  EB1[[EBS 1]]
  EB2[[EBS 2]]
  EB3[[EBS 3]]
  EC --> EB1
  EC --> EB2
  EC --> EB3
In the same AZ, an EBS can be detached from 1 EC2 and connected to a new EC2 instance
1 EBS to 1 EC2 (typically):
flowchart LR
  EC[EC2] --> EB1[[EBS 1]]
1 EBS volume to Many EC2 Instances (recently supported for some instances):
flowchart LR
  EB1[[EBS 1]]
  ECA[EC2 A]
  ECB[EC2 B]

  EB1 --> ECA
  EB1 --> ECB
Additional Points:
The external drive is separate from the computer. That means, if an accident happens and the computer goes down, you still have your data on your external drive. The same is true for EBS volumes.
You’re limited to the size of the external drive, since it has a fixed limit to how scalable it can be. For example, you may have a 2 TB external drive and that means you can only have 2 TB of content on there. This relates to EBS as well, since volumes also have a max limitation of how much content you can store on the volume.
5.2.3 How to scale Amazon EBS Volumes
Increase the volume size, as long as it doesn’t increase above the maximum size limit. For EBS volumes, the maximum amount of storage you can have is 16 TB. That means if you provision a 5 TB EBS volume, you can choose to increase the size of your volume until you get to 16 TB.
Attach multiple volumes to a single Amazon EC2 instance. EC2 has a one-to-many relationship with EBS volumes. You can add these additional volumes during or after EC2 instance creation to provide more storage capacity for your hosts.
5.2.4 Two types of AMIs for EC2 Instances
flowchart TD
  AMI(AMI)
  AMI1[[Instance Store<br>Backed AMI]]
  AMI2[[EBS-Volume<br>backed AMI<br>most common]]
  AMI --> AMI1
  AMI --> AMI2
Key Points: - When EC2 running on instance-store backed AMI is stopped, data is lost. - Instance-store backed AMIs are useful for stateless applications - It can be rebooted without losing data
5.2.5 Latency vs Throughput discussion
Latency: - Amount of time it takes for ONE data packet to reach its destination - For databases and Web <-> Server Interactions
flowchart LR
  W[Web Server] -- 1 packet sent<br> in 10 millisec --> C[Client]
Throughput: - Number of packets that can reach a destination within 1 sec - Needed in Big Data Analytics
flowchart LR
  W[Web Server] -- 10 packets sent<br> in 1 sec --> C[Client]
5.2.6 Types of EBS Volumes
flowchart TD
  EBS(EBS Volumes)
  subgraph SSD
    EBS_SSD(EBS SSD)
    SSD1[[EBS Provisioned IOPS SSD]]
    SSD2[[EBS General Purpose SSD]]
    EBS_SSD --> SSD1
    EBS_SSD --> SSD2
    SSD1 --> app1((for latency sensitive<br>workloads))
    app1 --> ex1((E.g. I/O intensive<br> NoSQL RDS<br>e.g. io2,io3))
    SSD2 --> app2((for general purpose;<br>variety of transactional<br>workloads))
    app2 --> ex2((for low-latency interactive apps;<br>e.g.:gp2,gp3))
    max1((Max IOPS/Volume =<br> 64K))
    vol_size1((Vol Size =<br> 4GB - 16 TB))
    max2((Max IOPS/Volume =<br> 16K))
    vol_size2((Vol Size =<br> 1GB - 16 TB))
    ex1 --> max1
    ex2 --> max2
    max1 --> vol_size1
    max2 --> vol_size2
  end
  subgraph HDD
    EBS_HDD(EBS HDD)
    HDD1[[Throughput<br>Optimized HDD]]
    HDD2[[Cold HDD]]
    apphd1((for frequently accessed<br>throughput intensive<br>workloads))
    apphd2((for less frequently<br>accessed workloads))
    maxhd1((Max IOPS/Volume =<br> 500))
    vol_sizehd1((Vol Size =<br> 500GB - 16 TB))
    maxhd2((Max IOPS/Volume =<br> 250))
    vol_sizehd2((Vol Size =<br> 500GB - 16 TB))
    EBS_HDD --> HDD1
    EBS_HDD --> HDD2
    HDD1 --> apphd1 --> maxhd1 --> vol_sizehd1
    HDD2 --> apphd2 --> maxhd2 --> vol_sizehd2
  end
  EBS --> EBS_SSD
  EBS --> EBS_HDD
  style HDD fill:#FFFF00,stroke:#333,stroke-width:2px
  style SSD fill:#FFFF00,stroke:#333,stroke-width:2px
Key Point: - solid-state drives (SSDs) are faster and expensive than hard-disk drives (HDDs)
| Need on Latency/Throughput | Applications | Most suited type of EBS |
|---|---|---|
| Very low latency | Databases, payment systems | Provisioned IOPS SSD |
| low latency | Web Server | General Purpose SSD |
| Very high throughput | Big Data | Throughput optimized HDD |
| can tolerate high latency but still might need good throughput because of data transer | Infrequently accessed data | Cold HDD |
5.2.7 Backups via EBS Snapshots:
- Concept: Incremental backups
- First time: Stores the entire data
- Second Snapshot: Store only data on what has changed
5.3: Object Storage with Amazon S3
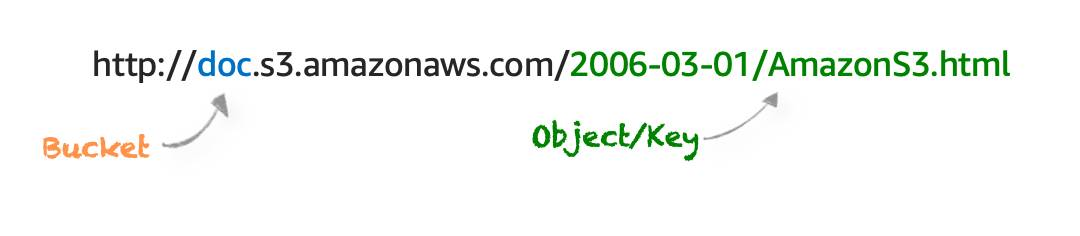
5.3.1 WHAT IS AMAZON S3? UNDERSTAND AMAZON S3 CONCEPTS
- Amazon S3 is an object storage service.
- Object storage stores data in a flat structure, using unique identifiers to look up objects when requested. An object is simply a file combined with metadata and that you can store as many of these objects as you’d like.
- All of these characteristics of object storage are also characteristics of Amazon S3.
5.3.2 Security for S3 Objects
- Everything is private by default
If you decide that you want everyone on the internet to see your photos, you can choose to make your buckets, folders, and objects public. Keep in mind that a public resource means that everyone on the internet can see it. Most of the time, you don’t want your permissions to be all or nothing. Typically, you want to be more granular about the way you provide access to your resources.
Amazon S3 provides two main access management features: IAM policies and S3 bucket policies.
5.3.3 When should one use S3 bucket policies:
- When you need a simple way to do cross-account access to S3, without using IAM roles.
- Your IAM policies bump up against the defined size limit. S3 bucket policies have a larger size limit.
S3 Bucket policies can only be placed on buckets, and cannot be used for folders or objects.
5.3.3 ENCRYPT S3
Amazon S3 reinforces encryption in transit (as it travels to and from Amazon S3) and at rest. To protect data at rest, you can use:
Server-side encryption: This allows Amazon S3 to encrypt your object before saving it on disks in its data centers and then decrypt it when you download the objects.
Client-side encryption: Encrypt your data client-side and upload the encrypted data to Amazon S3. In this case, you manage the encryption process, the encryption keys, and all related tools.
5.3.4 USE VERSIONING TO PRESERVE OBJECTS
Versioning-enabled buckets let you recover objects from accidental deletion or overwrite.
Deleting an object does not remove the object permanently. Instead, Amazon S3 puts a marker on the object that shows you tried to delete it. If you want to restore the object, you can remove this marker and it reinstates the object.
If you overwrite an object, it results in a new object version in the bucket. You still have access to previous versions of the object.
Buckets can be in one of three states.
- Unversioned (the default): No new or existing objects in the bucket have a version.
- Versioning-enabled: This enables versioning for all objects in the bucket.
- Versioning-suspended: This suspends versioning for new objects. All new objects in the bucket will not have a version. However, all existing objects keep their object versions.
5.3.5 AMAZON S3 STORAGE CLASSES
Here are the main types of Amazon S3 storage options:
S3 Standard Use Case: Frequently accessed data. Availability: 99.99%. Durability: 99.999999999% (11 nines). Performance: Low latency, high throughput. Cost: Higher cost compared to other classes. Typical Uses: Websites, content distribution, data analytics, and mobile applications.
S3 Intelligent-Tiering Use Case: Data with unpredictable access patterns. Availability: 99.9%. Durability: 99.999999999% (11 nines). Performance: Automatically moves data between two access tiers (frequent and infrequent) to optimize cost. Cost: Slightly higher than Standard but saves on infrequently accessed data by automatically moving data to lower-cost storage tiers.
S3 Standard-Infrequent Access (S3 Standard-IA) Use Case: Data that is infrequently accessed but requires rapid access when needed. Availability: 99.9%. Durability: 99.999999999% (11 nines). Cost: Lower storage cost, higher retrieval cost compared to S3 Standard. Typical Uses: Backups, disaster recovery, long-term storage.
S3 One Zone-Infrequent Access (S3 One Zone-IA) Use Case: Infrequently accessed data that doesn’t require multi-zone redundancy. Availability: 99.5%. Durability: 99.999999999% (11 nines) within a single Availability Zone. Cost: Lower cost than S3 Standard-IA. Typical Uses: Data that can be recreated easily, backups, or secondary copies.
S3 Glacier
Use Case: Long-term archive storage where retrieval time can range from minutes to hours. Availability: 99.99%. Durability: 99.999999999% (11 nines). Cost: Very low storage cost, retrieval incurs additional cost and delay. Typical Uses: Archival data, regulatory compliance, and historical records.
S3 Glacier Deep Archive Use Case: Long-term archive for data that is rarely accessed and has retrieval times of up to 12 hours. Availability: 99.99%. Durability: 99.999999999% (11 nines). Cost: Lowest-cost storage option in S3, with higher retrieval times. Typical Uses: Long-term data retention for compliance or legal purposes.
S3 Outposts Use Case: Storing data on-premises for applications that need local data residency. Durability: Same as S3 (99.999999999%). Typical Uses: Local workloads that need low latency or local data processing, and when compliance requires data to stay on-premises.
5.3.6 AUTOMATE TIER TRANSITIONS WITH OBJECT LIFECYCLE MANAGEMENT
When you define a lifecycle policy configuration for an object or group of objects, you can choose to automate two actions: transition and expiration actions.
- Transition actions are used to define when you should transition your objects to another storage class.
- Expiration actions define when objects expire and should be permanently deleted.
The following use cases are good candidates for lifecycle management.
Periodic logs: If you upload periodic logs to a bucket, your application might need them for a week or a month. After that, you might want to delete them.
Data that changes in access frequency: Some documents are frequently accessed for a limited period of time. After that, they are infrequently accessed. At some point, you might not need real-time access to them, but your organization or regulations might require you to archive them for a specific period. After that, you can delete them.
5.3.7 AWS Storage Services Recap
Amazon EC2 Instance Store
- Instance store is ephemeral block storage
- For stateless applications
EC2 Instance Store is not meant for data that is persistent or long-lasting. If you need persistent long-term block storage that can be detached from Amazon EC2 and provide you more management flexibility, such as increasing volume size or creating snapshots, then you should use Amazon EBS.
Amazon EBS
Amazon EBS is meant for data that changes frequently and needs to persist through instance stops, terminations, or hardware failures. Amazon EBS has two different types of volumes
- SSD - For I/O-sensitive workloads
- HDD - For Throughput-intensive workloads
Amazon S3
- It is object storage.
- You pay for what you use (you don’t have to provision storage in advance).
- Amazon S3 replicates your objects across multiple Availability Zones in a Region.
- Amazon S3 is not storage attached to compute.
Amazon Elastic File System (Amazon EFS) and Amazon FSx
- Also Serverless
- No need to provision in advance
- Pay for what you use
5.4 Notes from Storage Quiz
- The size of an individual object in S3 can be 5 TB. S3 can be really useful for media hosting and storing videos
- EBS works well as a storage layer for high transaction relational database.
- The data on an instance store volume (also informally referred to as local storage of the EC2 instance) persists even if the instance is rebooted. However, the data does not persist if the instance is stopped, hibernated, or terminated.
S3 Standard Infrequent Accesswhen rarely accessed file need quick retrieval vsS3 Glacier Deep Archive(the lowest-cost option) when rarely accessed file needs to be stored only for legal requirements and are ok for longer retrieval timesBlock Storageis the best storage option if only a small portion of the files require change.Amazon DynamoDBallowsflexible schema- where theitemsin a table can have varying attributes outside of theprimaryandsecondarykey
6. Databases in AWS
6.1 My ChatGPT Interactions on Databases in AWS
6.1.1 Q) What is the difference between database, data warehouse and data lake. Explain with examples from AWS.
flowchart TD
  Q((Where is<br>data stored?))
  A1[[Database]]
  A2[[Data Warehouse]]
  A3[[Data Lake]]

  P1((for OLTP))
  P2((for OLAP))
  P3((for storing raw data))

  E1[Amazon RDS<br>for an e-commerce<br>application]
  E2[Amazon Redshift<br>to query and analyze <br>vast amounts of <br>structured data<br>quickly and efficiently.]
  E3[Amazon S3<br>for storing vast amounts of<br>unstructured raw data]

  Q --> A1
  Q --> A2
  Q --> A3

  A1 --> P1 --> E1
  A2 --> P2 --> E2
  A3 --> P3 --> E3
The terms database, data warehouse, and data lake all refer to systems for managing and storing data, but they serve different purposes and are optimized for different types of data and use cases. Here’s a breakdown, along with AWS examples:
1. Database
Purpose: A database is designed to store structured data that can be easily queried and updated. It’s typically used for transactional processing (OLTP: Online Transaction Processing) where you need to manage day-to-day operations like inserts, updates, and deletes efficiently.
Data Type: Structured data (e.g., relational data with tables, rows, and columns).
Use Cases: Applications like inventory management, customer management, e-commerce websites, or any app that involves a lot of concurrent, real-time transactions.
AWS Example:
- Amazon RDS (Relational Database Service): Supports databases like MySQL, PostgreSQL, SQL Server, and Oracle. It’s managed, which means AWS takes care of backups, patching, and scaling.
- Amazon DynamoDB: A NoSQL database for high-speed, low-latency performance, often used for large-scale applications that require flexible data models.
Example Use Case: An e-commerce website storing customer orders and product information in Amazon RDS for efficient querying and real-time updates.
2. Data Warehouse
Purpose: A data warehouse is optimized for analytical processing (OLAP: Online Analytical Processing) where large volumes of structured data are aggregated and analyzed. It is ideal for complex queries, reporting, and business intelligence (BI) tasks.
Data Type: Primarily structured data, although it may support semi-structured data (e.g., JSON or Parquet formats). Data is typically cleaned and organized before loading into a data warehouse.
Use Cases: Business analytics, trend analysis, data mining, generating reports or dashboards across large data sets (e.g., sales trends across regions or customer segments).
AWS Example:
- Amazon Redshift: A fully managed, petabyte-scale data warehouse designed for fast query execution across large datasets. Redshift is built for complex queries and analytics, and it integrates well with BI tools like Amazon QuickSight.
Example Use Case: A retail company uses Amazon Redshift to analyze sales data across regions to understand seasonal buying trends and forecast future demand.
3. Data Lake
Purpose: A data lake is a centralized repository that allows you to store structured, semi-structured, and unstructured data at any scale. It’s highly flexible and is often used to store raw data until it’s needed for analysis. It supports various formats (e.g., JSON, CSV, images, video, text logs) and allows for big data analytics and machine learning.
Data Type: Structured, semi-structured, and unstructured data (e.g., documents, audio, videos, logs, sensor data).
Use Cases: Data exploration, machine learning, big data analytics, and situations where you want to store a vast array of data types before deciding what analysis or processing you need.
AWS Example:
- Amazon S3 (Simple Storage Service): Typically used to build a data lake in AWS. You can store any type of data in its native format and then later analyze it using other AWS services like AWS Glue (for data transformation), Amazon Athena (for querying), or Amazon EMR (for big data processing).
Example Use Case: A healthcare company uses Amazon S3 to store vast amounts of raw patient data, including medical images, doctor notes, and sensor data from wearables. They later process this data for machine learning models and analytics.
Key Differences:
| Feature | Database (RDS/DynamoDB) | Data Warehouse (Redshift) | Data Lake (S3) |
|---|---|---|---|
| Primary Use | Transactional (OLTP) | Analytical (OLAP) | Store raw data, Big Data |
| Data Type | Structured | Structured, Semi-structured | Structured, Semi-structured, Unstructured |
| Processing | Real-time transactions | Aggregated, Complex queries | Data exploration, batch processing |
| AWS Service | Amazon RDS, DynamoDB | Amazon Redshift | Amazon S3 |
| Example | E-commerce apps, customer orders | Business analytics, dashboards | Raw data for analytics, ML |
Summary of AWS Services:
- Database → Amazon RDS for relational databases or DynamoDB for NoSQL databases.
- Data Warehouse → Amazon Redshift for OLAP and analytical workloads.
- Data Lake → Amazon S3 to store large datasets in various formats for big data analytics.
6.1.2 Q) Are all AWS Databases in EC2 instances? Are they named as db.xxx ?
No, not all AWS databases run on EC2 instances, and they are not named as db.xxx by default. While some database services in AWS may use EC2 instances under the hood, many of them are fully managed services, meaning you don’t need to worry about the underlying EC2 infrastructure. Let me explain further:
1. Managed Databases (Not necessarily tied to EC2 instances)
AWS provides fully managed databases, which abstract away the underlying infrastructure, including EC2 instances, networking, and scaling. With these services, AWS handles most operational tasks like backups, patching, scaling, and failover.
Here are some examples of fully managed AWS database services: - Amazon RDS (Relational Database Service): A managed service for relational databases like MySQL, PostgreSQL, Oracle, SQL Server, and MariaDB. It is designed to handle the operational management of these databases, though the actual database may run on EC2 instances in the background. As a user, you don’t have direct access to the underlying EC2 instances.
Amazon Aurora: A high-performance, MySQL- and PostgreSQL-compatible relational database built for the cloud. Like RDS, Aurora abstracts away the EC2 instances, providing a managed environment.
Amazon DynamoDB: A fully managed NoSQL database that scales horizontally. It doesn’t require EC2 instances, and you don’t need to manage the underlying servers or instances.
Amazon Redshift: A managed data warehouse that allows you to run analytics on structured data. While Redshift clusters are backed by EC2 instances, you manage them at a higher level through the Redshift interface.
Amazon DocumentDB: A fully managed MongoDB-compatible database that abstracts away the underlying EC2 instances.
In these fully managed services, the database instances are not explicitly named as db.xxx; instead, you interact with these services through their respective APIs or consoles without seeing the underlying infrastructure. However, you may define instance identifiers or cluster names like “db1” when provisioning databases, but this is customizable.
2. Self-Managed Databases on EC2 (Named as db.t3.medium, etc.)
If you self-manage a database on an EC2 instance, then you directly control the EC2 infrastructure. In this case, you would need to handle database installation, patching, backups, scaling, and networking yourself. You could launch a database server (e.g., MySQL, PostgreSQL) on an EC2 instance, and here you would see the EC2 instance types named in the t3, m5, db.m6g, or similar families.
Some instance types in RDS do use naming patterns like db.m6g.large, but this is specific to Amazon RDS and Aurora, which provide a managed environment on top of EC2. For example: - db.t3.medium (RDS instance) → This is an instance class used for databases in Amazon RDS, where t3.medium is an EC2 instance type optimized for general-purpose workloads, but the naming convention here indicates that it’s used for a database (db. prefix).
Summary:
- Not all AWS databases run on EC2 instances. Services like DynamoDB and Aurora abstract the infrastructure so you don’t manage EC2s directly.
- In Amazon RDS, the underlying instances may be named as
db.xxx(e.g.,db.t3.medium), but this is specific to the RDS service. - If you’re running a database directly on EC2, you choose standard EC2 instance types like
t3.medium, and you’re responsible for managing the database yourself.
6.1.3 Q) So a PostgreSQL DB can be either Self-Managed Databases on EC2 or AWS Managed ?
Yes, in AWS, a PostgreSQL database can be deployed in two primary ways:
- Self-Managed on EC2:
- Description: You launch a PostgreSQL database on an EC2 instance, essentially creating a self-managed environment where you control the entire database stack.
- Responsibilities: You handle installation, configuration, patching, backup, scaling, and security management.
- Flexibility: Full control over the PostgreSQL settings, customizations, and extensions.
- Use Case: Ideal if you need custom configurations or PostgreSQL plugins that aren’t supported in managed services, or if you want to control the environment entirely.
- AWS Managed PostgreSQL (Amazon RDS or Amazon Aurora):
- Description: Amazon RDS for PostgreSQL and Amazon Aurora (PostgreSQL-compatible) are fully managed database services that AWS operates.
- Responsibilities: AWS handles provisioning, patching, backup, scaling, and automatic failover. You only need to manage data, schema, and performance tuning.
- Flexibility: Limited to configurations and extensions that AWS supports.
- Use Case: Best for users who prefer a managed, highly available, and scalable PostgreSQL solution without the administrative overhead.
So, self-managed on EC2 gives you complete control and flexibility, whereas AWS-managed services offer ease of use and reduced operational burden at the cost of some customization flexibility.
6.2. Managed Databases in Amazon
flowchart TD
  DB((Databases))
  ADB[Databases in AWS]
  M[AWS Managed Databases]
  UM[Self Managed Databases]
  OP[On-Prem Database]
  SM[Self-managed Database on Amazon EC2]

  M1[Amazon RDS]
  M2[Amazon Aurora]
  M3[Amazon DynamoDB]
  M4[Amazon Redshift]

  REL((Releational DB))
  MEX1[MySQL]
  MEX2[PostgreSQL]
  MEX3[MariaDB]
  MEX4[SQLServer]
  MEX5[Oracle]

  MAA1[Aurora MySQL]
  MAA2[Aurora PostgreSQL]

  MAAP1((5x faster than RDS))
  MAAP2[Aurora Serverless]

  NOREL((NoSQL DB))

  DDB1((Serverless))
  BOTH1((Charges based on usage and storage))
  BOTH2((High Availability))
  BOTH3((High Durable))
  BOTH4((Because: SSD-backed Instances))

  DB --> ADB
  DB --> OP

  ADB --> M
  ADB --> UM
  ADB --> SM
  M --> M1
  M --> M2
  M --> M3
  M --> M4

  M1 --> REL --> MEX1
  REL --> MEX2
  REL --> MEX3
  REL --> MEX4
  REL --> MEX5

  M2 --> MAA1 --> MAAP1
  M2 --> MAA2 --> MAAP1
  M2 --> MAA1 --> MAAP2
  M2 --> MAA2 --> MAAP2
  MAAP2 --> BOTH1
  BOTH2 --> BOTH4
  BOTH3 --> BOTH4

  M3 --> NOREL --> DDB1 --> BOTH1
  DDB1 --> BOTH2
  DDB1 --> BOTH3
  MAAP2 --> BOTH2
  MAAP2 --> BOTH3
6.3 Decisions to make when choosing a DB
flowchart TB
  DB[Choices<br>in Selecing a DB<br>in AWS]
  ENG[Engine]
  STORAGE[Storage]
  COMPUTE[Compute]

  ENG1((Commercial))
  ENG2((Open Source))
  ENG3((AWS Native))

  ENG1A[[Oracle<br>SQLServer]]
  ENG2A[[MySQL<br>PostgreSQL]]
  ENG3A[[Amazon Aurora]]


  STORAGE1[[EBS Volumes for RDS]]
  COMPUTE1[[Compute Instance <br>Size and Family <br><br>db.xx?]]

  TYPE1[Standard<br> <code>m</code> classes?]
  TYPE2[Memory<br>Optimized<br><code>r</code> and <code>x` classes?]
  TYPE3[Burstable<br><code>t</code> classes?]

  S1[SSD?]
  S2[HDD?]
  S3[Magnetic Storage?]

  DB --> ENG --> ENG1
  ENG --> ENG2
  ENG --> ENG3

  ENG1 --> ENG1A
  ENG2 --> ENG2A
  ENG3 --> ENG3A

  DB --> STORAGE --> STORAGE1
  DB --> COMPUTE --> COMPUTE1

  STORAGE1 --> S1
  STORAGE1 --> S2
  STORAGE1 --> S3

  COMPUTE1 --> TYPE1
  COMPUTE1 --> TYPE2
  COMPUTE1 --> TYPE3
6.4 Where are Database Instances placed?
RDS lies inside VPC Private Subnet
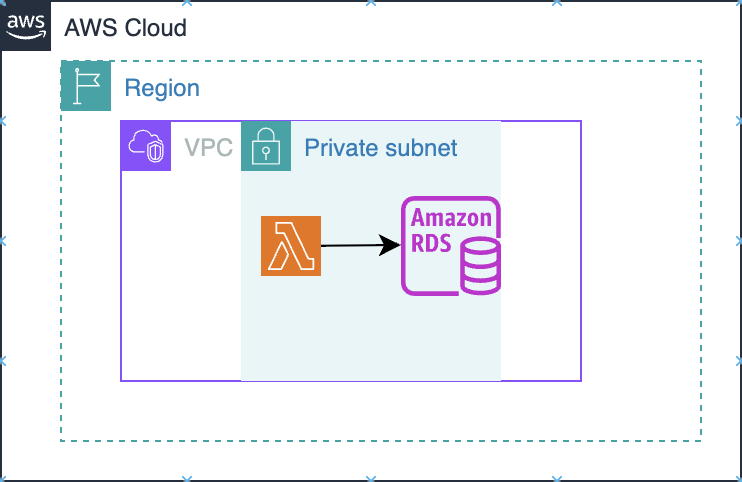
Dynamo DB lies outside VPC
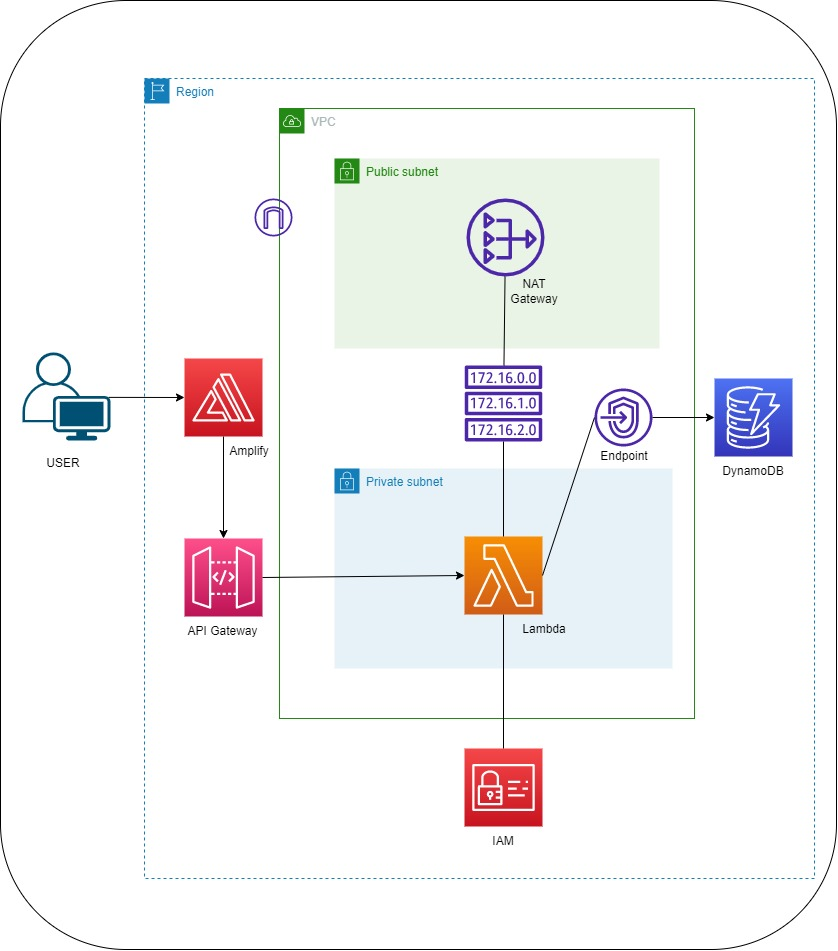
Source: AWS rePost
6.5 Backups in RDS
flowchart TD
  B((Backups))
  A((Automated Backups))
  M((Manual Snapshots))

  K((Keep backups<br>for 0 to 35 days))
  ZERO((0 days means<br>no backup))
  E((Enables in<br>point-in-time<br>recovery))

  P((For storage<br>longer than 35 days))

  Q((Which backup<br>to use))
  ANS((Both Automated &<br>Manual combo))

  B --> A
  B --> M

  A --> K --> ZERO --> E

  M --> P

  B --> Q --> ANS
6.6 Redundancy in RDS via Multiple Avalaibility Zones
flowchart TD
  RDS[[Amazon RDS]]
  subgraph AZ1
     subgraph subnetA
       C1[[Copy 1 of RDS]]
     end
  end

  subgraph AZ2
    subgraph subnetB
      C2[[Copy 2 of RDS]]
    end
  end
  RDS --> C1
  RDS --> C2
  %% Apply bright yellow background to subgraphs
  style AZ1 fill:#FFFF00,stroke:#333,stroke-width:2px
  style AZ2 fill:#FFFF00,stroke:#333,stroke-width:2px
  style subnetA fill:#FFFF00,stroke:#333,stroke-width:2px
  style subnetB fill:#FFFF00,stroke:#333,stroke-width:2px
- Multi AZ deployment ensure
High AvailabilityandHigh Durability
6.7 Encryption of EBS Volumes
Consider this scenario: You are a cloud engineer who works at a company that uses Amazon Elastic Compute Cloud (Amazon EC2) instances and Amazon Elastic Block Store (Amazon EBS) volumes. The company is currently using unencrypted EBS volumes. You are tasked with migrating the data on these unencrypted EBS volumes to encrypted EBS volumes. What steps can you take to migrate the data to encrypted EBS volumes?
To migrate data from unencrypted to encrypted Amazon EBS volumes, follow these steps:

1. Create a snapshot of the unencrypted EBS volume.
2. Copy the snapshot, and during the copy process, select the option to encrypt the snapshot.
3. Once the encrypted snapshot is created, create a new EBS volume from the encrypted snapshot.
4. Detach the unencrypted volume from the EC2 instance.
5. Attach the new encrypted volume to the EC2 instance in place of the original.

This ensures seamless migration of data from unencrypted to encrypted EBS volumes without downtime.
Source: One of the answers from a Cousera Forum
6.8 DynamoDB
- Amazon DynamoDB is a fully managed NoSQL database service
- With DynamoDB, you can create database tables that can store and retrieve any amount of data and serve any level of request traffic.
- Data in DynamoDB stored in Key-Value pair format
| RDS | NoSQL DB |
|---|---|
| Table | Table |
| Row/Record | Item |
| Column | Attribute |
Like a primary column in RDS, a primary attribute is needed in Dynamo DB. An item could have any number of attributes
6.9 Notes from Database Quiz
7. Monitoring in AWS
Why Monitoring? - Ensuring reliable performance - Are we using resources in a cost-effective way? - Preventive Healthcheck: Prevent outage by scaling infra or fixing issues automated - For security
7.1 Intro to AWS CloudWatch
7.1.1 Services in CloudWatch:
- Metrics
- Alarms (when a metric goes above a threshold)
- Logs
7.1.2 Types of Cloudwatch Metrics
flowchart TD
  M((Metrics))
  M1((Default <br>AWS Service Metrics))
  M2((Custom<br>Application Metrics))

  EX1((Eg -<br>No of hits to a Service))
  EX2((Eg -<br>Website Load Times))

  M --> M1
  M --> M2

  M1 --> EX1
  M2 --> EX2
7.1.3 Types of Monitoring
- By default, with the AWS account, a
basic monitoringis enabled (where every 5 minutes some metrics reach the CloudWatch dashboard) - A
detailed monitoringat additional cost can be setup if say, metrics need to be logged every 1 minute instead of 5 minutes
7.1.4 How to filter/categorize Metrics
flowchart TD
  M((Metrics))

  M1((Dimensions))
  M2((Namespaces))

  EX1((Key/Value pair-<br>FunctionName/MyLambda))
  EX2((Metrics <br>belonging to<br>different categories-<br>aws/ec2,<br>aws/lambda))

  M --> M1 --> EX1
  M --> M2 --> EX2
- A
Dimensioncan be used to filter the metrics - A
Namespacegives a logical grouping of the logs into different categories
7.1.5 Custom Metrics
Using boto3 sdk, you can ensure custom metrics like the following that reflect the health of your application can be sent to CloudWatch logs
- Web page Load Time
- Amount of tasks handled
7.2 Other Services in CloudWatch
7.2.1 Understand the CloudWatch Dashboards
- For viewing aggregated statistics of CloudWatch metrics
7.2.2 CloudWatch Logs
- For lambda, easy to setup: Enable in IAM policy
- For EC2, enable CW logs agent
7.2 CloudWatch Alarms
- When a metric goes above a threshold, an alarm can be set
7.3 EventBridge
- For a Rule-triggered workflow
- Allows you to define rules that filter events based on specific patterns and forward those events to one or more targets.
7.4 Notes from Monitoring Quiz
- Amazon CloudWatch Widgets are used to view and analyze metrics in CloudWatch Dashboard
The 3 states of a metric alarm in CloudWatch:
OK(metric is within the defined threshold),Alarm(metric is outside the defined threshold),Insufficient_data(metric does not have enough data to decide on the alarm)VPC Network traffic (what network comes in and out of the VPC) can be measured by VPC Flow Logs
By default, Lambda functions run in a
Lambda-managed VPC that has internet access. So one need not configure a VPC, Subenets and Security Group unless they want to have their lambda accessed from inside a VPC in their own account. In that case,m you can add a VPC configuration to a lambda function. This restricts the lambda function to resources within that VPC, unless the VPC has internet access
Source: A github source for Week 4 Quiz
8. Optimization in AWS
8.1 Notation in Nines:
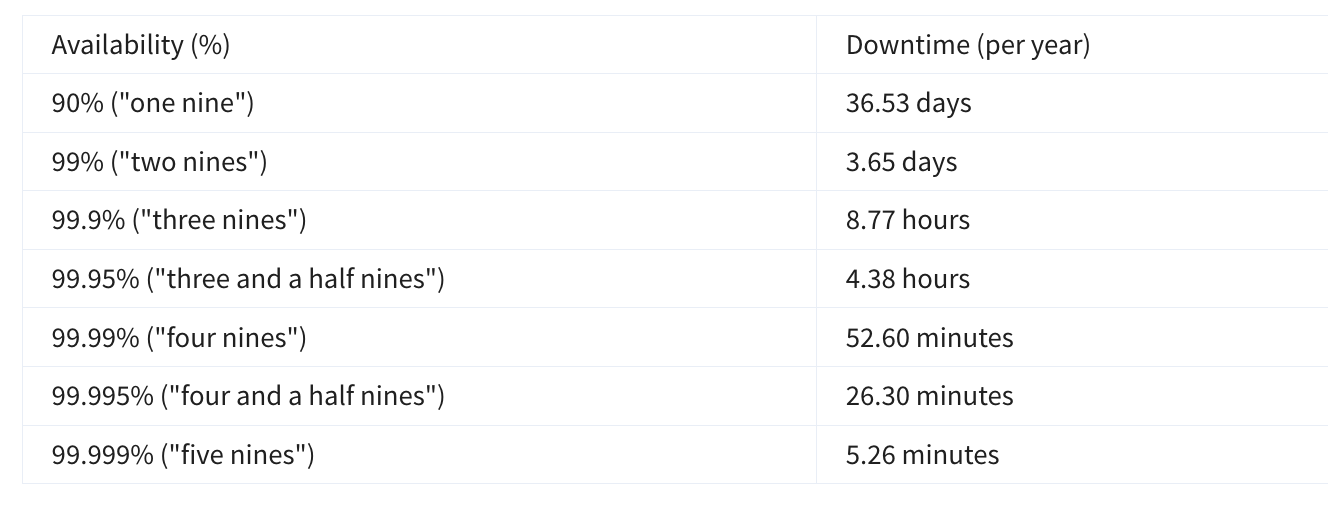
8.2 Automatically use a Second Server in a different availability zone
flowchart TD
  client
  load_balancer
  subgraph AZ1
    server_1
  end
  subgraph AZ2
    server_2
    server_3
  end

  client --> load_balancer
  load_balancer --> server_1
  load_balancer -- if server_1<br>goes down --> server_2
8.3 Types of High Availability Architecture
Active-active clusters rely on a dedicated load balancer for routing or distributing traffic across all participating nodes. The manner by which a load balancer distributes traffic depends on the specific load balancing algorithm used. For instance, some load balancers distribute traffic using Round-Robin, Weighted Round Robin or Random algorithm.
Active-passive setups are common in disaster recovery (DR) strategies. In some DR strategies, the passive node is set up in a separate geographical location and then brought into play once the active node becomes incapacitated
Source for the images and above content: An article on High Availability Architectures
flowchart TD
  HA[high_availability<br> architectures]
  AP[active_passive]
  AA[active_active]

  P1((for Stateful<br>Applications))
  P2((for Stateless<br>Applications))

  HA --> AP
  HA --> AA

  AP --> P1
  AA --> P2
8.4 Route Traffic with Amazon Elastic Load Balancing
8.4.1 What is a Load Balancer:
- Purpose is to distribute the requests across all the servers hosting the application using a load balancer
Load balancing refers to the process of distributing tasks across a set of resources. In the case of the corporate directory application, the resources are EC2 instances that host the application, and the tasks are the different requests being sent. It’s time to distribute the requests across all the servers hosting the application using a load balancer.
To do this, you first need to enable the load balancer to take all of the traffic and redirect it to the backend servers based on an algorithm. The most popular algorithm is round-robin, which sends the traffic to each server one after the other.
A typical request for the application would start from the browser of the client. It’s sent to a load balancer. Then, it’s sent to one of the EC2 instances that hosts the application. The return traffic would go back through the load balancer and back to the client browser. Thus, the load balancer is directly in the path of the traffic.
Although it is possible to install your own software load balancing solution on EC2 instances, AWS provides a service for that called Elastic Load Balancing (ELB).
8.4.2 FEATURES OF ELB
The ELB service provides a major advantage over using your own solution to do load balancing, in that you don’t need to manage or operate it. It can distribute incoming application traffic across EC2 instances as well as containers, IP addresses, and AWS Lambda functions.
The fact that ELB can load balance to IP addresses means that it can work in a hybrid mode as well, where it also load balances to on-premises servers.
ELB is highly available. The only option you have to ensure is that the load balancer is deployed across multiple Availability Zones.
In terms of scalability, ELB automatically scales to meet the demand of the incoming traffic. It handles the incoming traffic and sends it to your backend application.
8.4.3 HEALTH CHECKS
Taking the time to define an appropriate health check is critical. Only verifying that the port of an application is open doesn’t mean that the application is working. It also doesn’t mean that simply making a call to the home page of an application is the right way either.
For example, the employee directory application depends on a database, and S3. The health check should validate all of those elements. One way to do that would be to create a monitoring webpage like “/monitor” that will make a call to the database to ensure it can connect and get data, and make a call to S3. Then, you point the health check on the load balancer to the “/monitor” page.
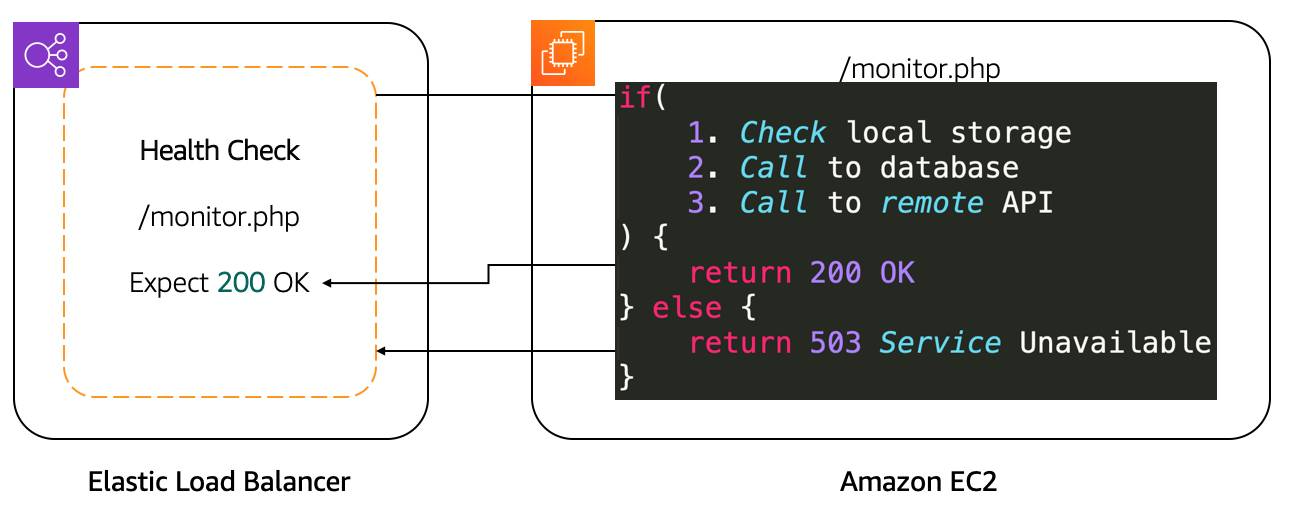
After determining the availability of a new EC2 instance, the load balancer starts sending traffic to it. If ELB determines that an EC2 instance is no longer working, it stops sending traffic to it and lets EC2 Auto Scaling know. EC2 Auto Scaling’s responsibility is to remove it from the group and replace it with a new EC2 instance. Traffic only sends to the new instance if it passes the health check.
In the case of a scale down action that EC2 Auto Scaling needs to take due to a scaling policy, it lets ELB know that EC2 instances will be terminated. ELB can prevent EC2 Auto Scaling from terminating the EC2 instance until all connections to that instance end, while preventing any new connections. That feature is called connection draining.
8.4.4 ELB COMPONENTS
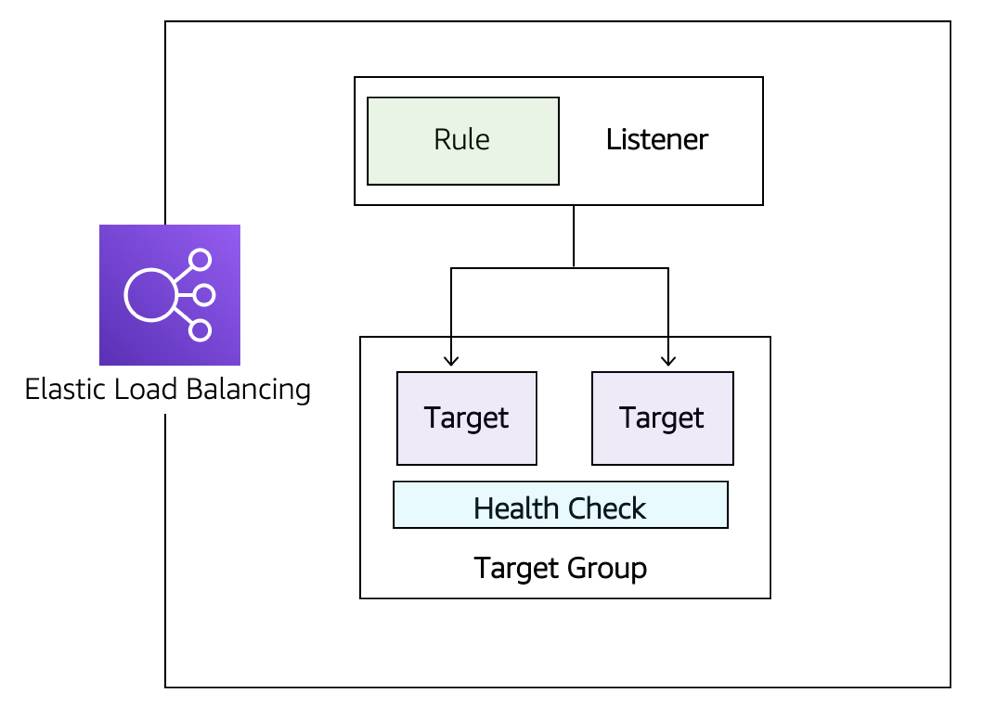
Listeners: The client connects to the listener. This is often referred to as client-side. To define a listener, a port must be provided as well as the protocol, depending on the load balancer type. There can be many listeners for a single load balancer.
Target groups: The backend servers, or server-side, is defined in one or more target groups. This is where you define the type of backend you want to direct traffic to, such as EC2 Instances, AWS Lambda functions, or IP addresses. Also, a health check needs to be defined for each target group.
Rules: To associate a target group to a listener, a rule must be used. Rules are made up of a condition that can be the source IP address of the client and a condition to decide which target group to send the traffic to.
8.5 APPLICATION LOAD BALANCER
- Granular routing: Routes traffic based on HTTP request data (URL path, host, headers, method, source IP).
- Direct responses: Can send fixed responses (e.g., HTML) or redirects (e.g., HTTP → HTTPS).
- TLS offloading: Handles HTTPS traffic with SSL certificates from IAM or AWS Certificate Manager (ACM).
- User authentication: Supports OpenID Connect and integrates with SAML, LDAP, Microsoft AD, etc.
- Traffic security: Uses security groups to restrict allowed IP ranges.
- Round-robin routing: Distributes requests evenly across servers.
- Least outstanding requests routing: Balances load by sending new requests to servers with fewer pending requests.
- Sticky sessions: Uses HTTP cookies to keep traffic from a client directed to the same backend server.
- Protocol scope: Supports HTTP and HTTPS only; use Network Load Balancer (NLB) for other protocols.
8.6 NLB
- Protocol support: Works with TCP, UDP, and TLS. Operates at the connection layer, so it does not understand HTTP/HTTPS.
- Flow hash routing: Routes traffic based on protocol, source/destination IP and port, and TCP sequence number.
- Sticky sessions: Based on the client’s source IP address (not cookies like ALB).
- TLS offloading: Can terminate TLS to reduce backend server load.
- High performance: Instantly handles millions of requests per second (no warm-up needed).
- Static and Elastic IPs: Supports direct client connections via fixed IP addresses—useful for DNS-restricted or firewall-rule scenarios.
- Source IP preservation: Passes the client’s real IP address to the backend (unlike ALB, which shows the LB’s IP).
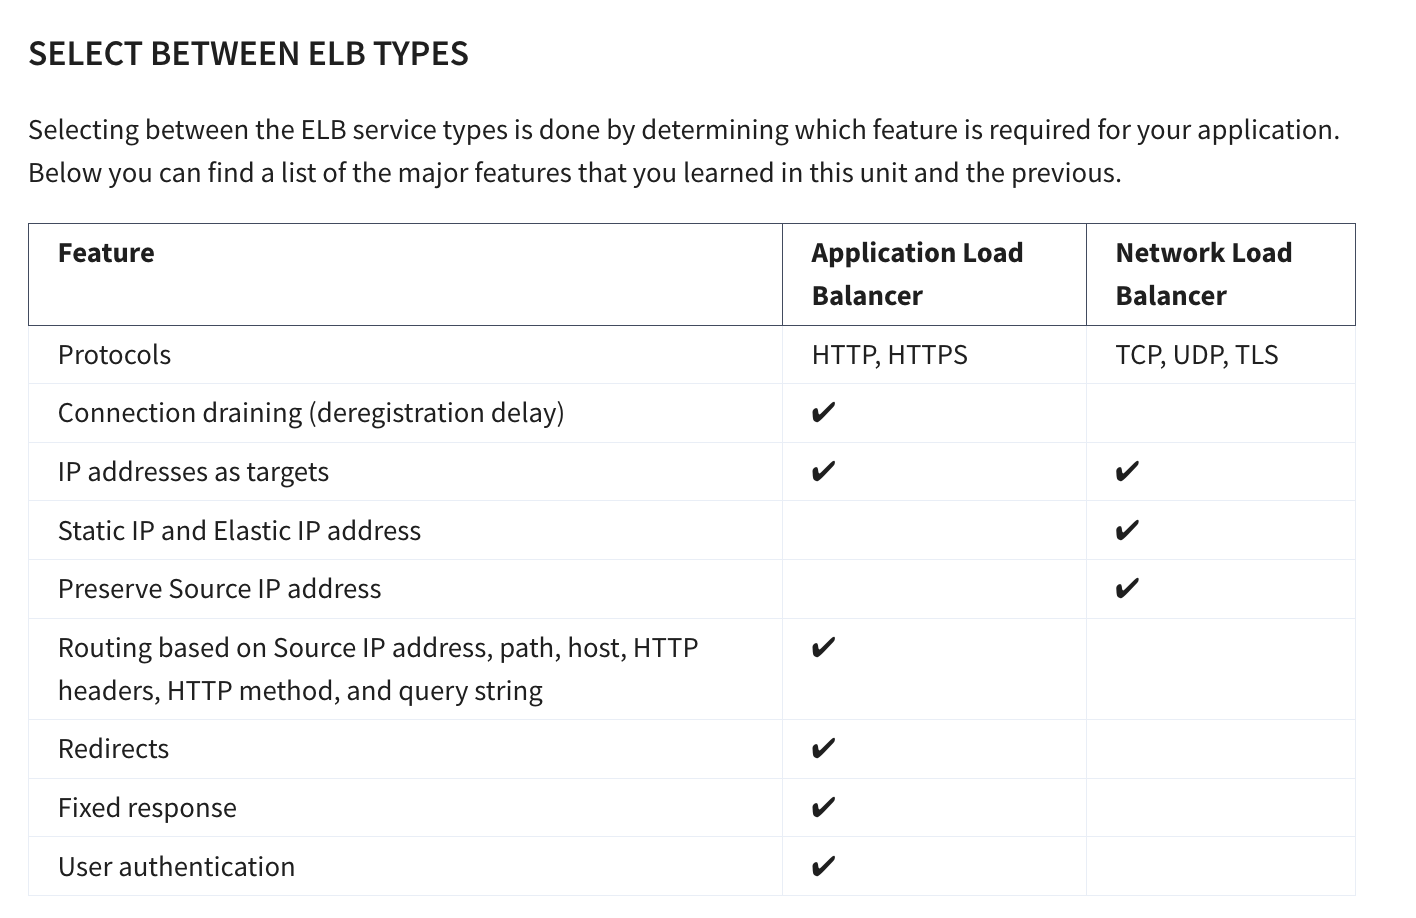
8.7 Intro to Amazon EC2 Auto Scaling
Availability and reachability is improved by adding one more server. However, the entire system can again become unavailable if there is a capacity issue. Let’s look at that load issue with both types of systems we discussed, active-passive and active-active.
8.7.1 Vertical Scaling
Active-Passive vs Active-Active Systems in Scaling
When too many requests are sent to a single active-passive system, the active server becomes unavailable and (hopefully) fails over to the passive server.
But this doesn’t really solve the problem.
Why Active-Passive Needs Vertical Scaling
- Active-Passive systems rely on vertical scaling (increasing server size).
- With EC2 instances, this means:
- Choosing a larger instance type
- Or switching to a different type
- Limitation: Scaling can only be done when the instance is stopped.
Steps for Vertical Scaling in Active-Passive
- Stop the passive instance (safe, since it’s not receiving traffic).
- Change the instance size or type, then start it again.
- Shift traffic to the passive instance (making it active).
- Stop, resize, and start the previous active instance (so both match).
Drawbacks of Active-Passive Scaling
- Manual and repetitive work each time traffic changes.
- A server can only scale vertically up to a limit.
- Once the limit is reached, the only option is to:
- Create another active-passive system
- Split requests and functionalities across them
- (Often requires massive application rewriting)
Active-Active Advantage
- With active-active systems, scaling is horizontal.
- Instead of making servers bigger, you simply add more servers.
- This approach is easier, more flexible, and avoids rewriting applications.
8.7.2 Horizontal Scaling
- Active-active system works well because the application is stateless (no client sessions stored on the server).
- Scaling from 2 → 4 servers requires no code changes.
- Just add or remove instances as needed.
- Scaling from 2 → 4 servers requires no code changes.
- Amazon EC2 Auto Scaling handles this automatically:
- Creates new EC2 instances when traffic increases.
- Terminates instances when traffic decreases.
- Creates new EC2 instances when traffic increases.
- Key advantage:
- Active-active + stateless apps = true scalability.
- Much more efficient compared to active-passive systems.
- Active-active + stateless apps = true scalability.
8.7.3 Integrate ELB with EC2 Auto Scaling
ELB and Auto Scaling Integration
The ELB service integrates seamlessly with EC2 Auto Scaling. As soon as a new EC2 instance is added to or removed from the EC2 Auto Scaling group, ELB is notified. However, before it can send traffic to a new EC2 instance, it needs to validate that the application running on that EC2 instance is available.
This validation is done via the health checks feature of ELB. Monitoring is an important part of load balancers, as it should route traffic to only healthy EC2 instances. That’s why ELB supports two types of health checks:
- TCP Health Check: Establishing a connection to a backend EC2 instance using TCP, and marking the instance as available if that connection is successful.
- HTTP/HTTPS Health Check: Making an HTTP or HTTPS request to a webpage that you specify, and validating that an HTTP response code is returned.
Traditional Scaling vs Auto Scaling
Traditional Scaling
- With a traditional approach to scaling, you buy and provision enough servers to handle traffic at its peak.
- At low traffic times (e.g., nighttime), there is more capacity than traffic.
- This leads to wasted money, since turning off servers only saves electricity, not provisioning costs.
Cloud (Auto Scaling) Approach
- Cloud uses a pay-as-you-go model.
- It’s important to turn off unused services, especially EC2 instances that run On-Demand.
- Manual scaling can work for predictable traffic, but unusual spikes cause:
- Over-provisioning → wasted resources.
- Under-provisioning → loss of customers.
- Over-provisioning → wasted resources.
Solution → EC2 Auto Scaling
- Automatically adds and removes EC2 instances based on conditions you define.
- Ensures the right number of EC2 instances are running at any time.
8.7.4 Using Amazon EC2 Auto Scaling
The EC2 Auto Scaling service works to add or remove capacity to keep a steady and predictable performance at the lowest possible cost. By adjusting the capacity to exactly what your application uses, you only pay for what your application needs. And even with applications that have steady usage, EC2 Auto Scaling can help with fleet management. If there is an issue with an EC2 instance, EC2 Auto Scaling can automatically replace that instance. This means that EC2 Auto Scaling helps both to scale your infrastructure and ensure high availability.
8.8 Configure EC2 Auto Scaling Components
There are three main components to EC2 Auto Scaling.
- Launch template or configuration:
- What resource should be automatically scaled?
- A configuration of parameters are used to create a EC2 instance
- AMI
- Security Group associated with the EC2 Instance
- EC2 Instance Type
- Additional EBS Volumes
- more
- All of these information are needed by
EC2 Auto Scalingto create the EC2 instances on our behalf
- EC2 Auto Scaling Group (ASG): Where should the resources be deployed? and How many should be deployed?
Where do you deploy the EC2 instances created via EC2 Auto Scaling - VPC - Subnets across different Availability Zones - Type of EC2 instance purchase: On-demand, Spot ?
How many EC2 instances should the ASG create? - Minimum - Maximum - Desired
- Scaling policies: When should the resources be added or removed?
- Scaling policy can be set based on metrics like CPU utilization, measured via a CloudWatch Alarm
8.8.1 Learn About Launch Templates
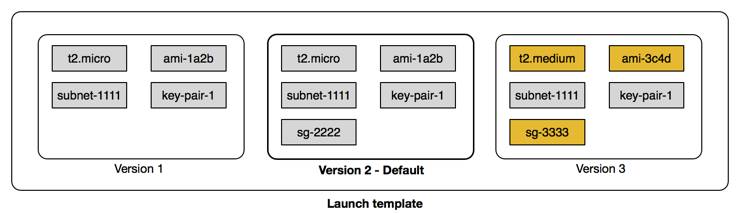
- There are multiple parameters required to create EC2 instances:
- Amazon Machine Image (AMI) ID
- Instance type
- Security group
- Additional Amazon Elastic Block Store (EBS) volumes
- And more…
- Amazon Machine Image (AMI) ID
- All this information is also required by EC2 Auto Scaling to create the EC2 instance on your behalf when there is a need to scale.
- This information is stored in a launch template.
Launch Template Usage
- You can use a launch template to manually launch an EC2 instance.
- You can also use it with EC2 Auto Scaling.
- It supports versioning, which allows:
- Quickly rolling back if there was an issue.
- Specifying a default version of your launch template.
- Iterating on a new version while other users continue launching EC2 instances with the default version.
- Quickly rolling back if there was an issue.
Ways to Create a Launch Template
- Using an existing EC2 instance (fastest way, since all settings are already defined).
- From an existing template or a previous version of a launch template.
- From scratch, where you need to define:
- AMI ID
- Instance type
- Key pair
- Security group
- Storage
- Resource tags
- AMI ID
Note
- Another way to define what Amazon EC2 Auto Scaling needs to scale is by using a launch configuration.
- However, a launch configuration:
- Does not support versioning.
- Cannot be created from an existing EC2 instance.
- Does not support versioning.
- For these reasons, and to ensure that you get the latest features, use a launch template instead of a launch configuration.
8.8.2 Get to Know EC2 Auto Scaling Groups
- The next component that EC2 Auto Scaling needs is an EC2 Auto Scaling Group (ASG).
- An ASG enables you to define where EC2 Auto Scaling deploys your resources.
- This is where you specify the Amazon Virtual Private Cloud (VPC) and subnets the EC2 instance should be launched in.
- An ASG enables you to define where EC2 Auto Scaling deploys your resources.
- EC2 Auto Scaling takes care of creating the EC2 instances across the subnets.
- It’s important to select at least two subnets that are across different Availability Zones (AZs).
- ASGs also allow you to specify the type of purchase for the EC2 instances:
- On-Demand only
- Spot only
- Combination of On-Demand and Spot (lets you take advantage of Spot instances with minimal admin overhead).
- On-Demand only
- To specify how many instances EC2 Auto Scaling should launch, configure three capacity settings for the group size:
- Minimum: The minimum number of instances running in your ASG, even if the threshold for lowering the amount of instances is reached.
- Maximum: The maximum number of instances running in your ASG, even if the threshold for adding new instances is reached.
- Desired capacity: The target number of instances in your ASG.
- This number must be within or equal to the minimum and maximum.
- EC2 Auto Scaling automatically adds or removes instances to match this number.
- This number must be within or equal to the minimum and maximum.
- Minimum: The minimum number of instances running in your ASG, even if the threshold for lowering the amount of instances is reached.

- Minimum capacity
- EC2 Auto Scaling keeps removing EC2 instances until it reaches the minimum capacity.
- Best practice: set at least two instances to ensure high availability.
- Even if scaling down is instructed, EC2 Auto Scaling won’t remove instances below the minimum.
- EC2 Auto Scaling keeps removing EC2 instances until it reaches the minimum capacity.
- Maximum capacity
- When traffic grows, EC2 Auto Scaling keeps adding instances.
- Costs will also increase as more instances are added.
- Setting a maximum ensures the number of instances doesn’t exceed your budget.
- When traffic grows, EC2 Auto Scaling keeps adding instances.
- Desired capacity
- This is the number of EC2 instances created when the Auto Scaling group is launched.
- If the desired capacity decreases, Auto Scaling removes the oldest instance by default.
- If it increases, Auto Scaling creates new instances using the launch template.
- This is the number of EC2 instances created when the Auto Scaling group is launched.
- Ensure availability with EC2 Auto Scaling
- Minimum, maximum, and desired capacity can be set to different values for dynamic scaling.
- If you want Auto Scaling only for fleet management, configure all three to the same value (e.g., 4).
- EC2 Auto Scaling will replace unhealthy instances to always maintain that count, ensuring high availability.
- Minimum, maximum, and desired capacity can be set to different values for dynamic scaling.
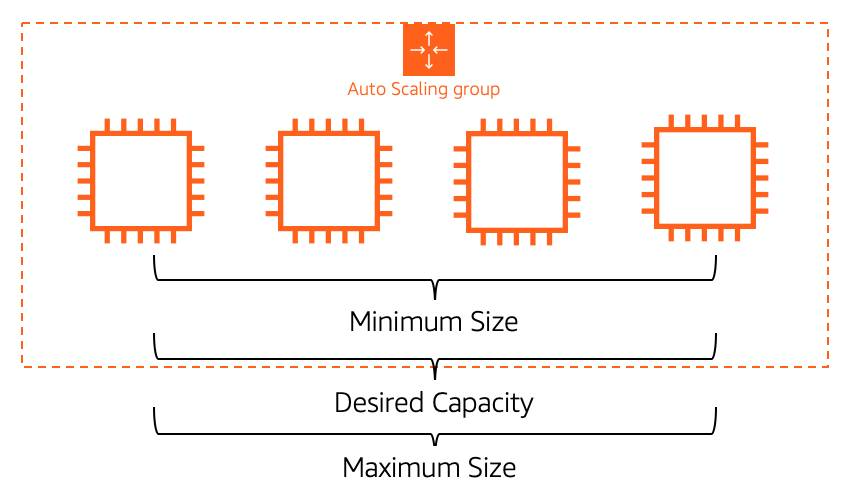
8.8.3 Enable Automation with Scaling Policies
ASG Desired Capacity
- By default, ASG stays at its initial desired capacity.
- Desired capacity can be manually changed or adjusted with scaling policies.
- Scaling policies use CloudWatch metrics & alarms (e.g., CPU > 70%) to trigger scaling actions.
- By default, ASG stays at its initial desired capacity.
Types of Scaling Policies
- Simple Scaling Policy
- Uses a CloudWatch alarm to add/remove instances or set desired capacity.
- Can use a fixed number or a percentage of group size.
- Includes a cooldown period to avoid premature scaling while new instances boot.
- Limitation: can’t handle multiple thresholds (e.g., 65% vs 85%).
- Uses a CloudWatch alarm to add/remove instances or set desired capacity.
- Step Scaling Policy
- Handles multiple thresholds with incremental actions.
- Example:
- +2 instances if CPU ≥ 85%
- +4 instances if CPU ≥ 95%
- +2 instances if CPU ≥ 85%
- Responds to alarms even if scaling activity is still in progress.
- Handles multiple thresholds with incremental actions.
- Target Tracking Scaling Policy
- Simplest and most dynamic option.
- Set a target value (e.g., avg CPU %, network in/out, request count).
- Automatically creates and manages the required CloudWatch alarms.
- Simplest and most dynamic option.
- Simple Scaling Policy
8.9 Optimization Notes from Quiz
- 3 Components of
EC2 AutoScaling: 1) Launch Template 2)EC2 AutoScaling Group, 3)Scaling Policy - A ELB automatically scales to meet incoming demand
- When a user uses ELB with an Auto Scaling Group, there is no need to manually register the individual EC2 instances scaled with the load balancer
- If you are routing to targets based on a rule that uses the path of the request, you are using
Application Load Balancer - If you are running low-latency apps, real time games or IoT applications, use
Network Load Balancer(if routing is NOT based on content-based routing) - An application can be scaled
Verticallyby adding more firepower (compute capacity) to the existing machine OR by scalinghorizontallyby adding more EC2 instances of similar compute capacity
Source: A github source for Week 4 Quiz
9. Additional References
AWS Coursera Course on
AWS Technical Essentials
Disclaimer: Beware: Not all information provided by ChatGPT is accurate. They get wrong quite a lot in nuanced sub-topics.
Plagiarism Disclosure:
- The below notes contain my own writing like mermaid charts and bullet points combined with copy-paste paragraph notes from Coursera course (not to be misjudged for plagiarism).
- Most pics are from Coursera course. If a pic is taken from outside, source is cited below it
- I have plenty of interactions with ChatGPT weaved into appropriate sections for better reading
- The below notes are purely to refresh my memory when I take up any AWS exam in future. Unlike other articles, the below notes are not meant to be reviewed from the pov of plagiarism.